Start with accessible design for learning: set clear, measurable goals, add captions and transcripts, and offer voice options like TTS or a cloned narrator. These steps give learners multiple ways to access content and boost comprehension.
-
Define one measurable goal, for example increase lecture comprehension scores or reduce help requests.
-
Add accurate captions and searchable transcripts for every video and audio file.
-
Provide narrated alternatives using human-like TTS or a vetted voice clone for consistency.
-
Track simple metrics, such as caption use rate, transcript downloads, and quiz changes.
Use the 30-day starter checklist in this guide to roll out changes fast. If you want to experiment, try a short free trial of an AI captioning and TTS tool to test workflows quickly.
Why accessible design for learning matters now
Accessible design for learning shapes who can access, engage with, and succeed in our courses. Legal, ethical, and pedagogical forces now converge to make accessibility a core responsibility for institutions. Acting now saves time, reduces risk, and improves outcomes for many learners.
Legal and policy drivers
Institutions face clear legal and policy pressures to make digital learning accessible. According to
WCAG 2 Overview | Web Accessibility Initiative (WAI) | W3C, the Web Content Accessibility Guidelines (WCAG) 2.2 were published on 5 October 2023, with an update on 12 December 2024. Regional laws and higher education policies reference these standards, and many governments enforce accessibility for public institutions. That makes compliance a planning-level issue, not an afterthought.
Pedagogy and equity: better learning for more people
Accessible design improves learning, not just compliance. Universal Design for Learning (UDL) principles encourage multiple ways to present information. That boosts retention, supports different attention spans, and helps learners process complex concepts.
Who benefits beyond students with disabilities:
-
Commuters who learn while listening to audio
-
Multilingual students who use captions to follow fast speech
-
Neurodiverse learners who need clear structure and transcripts
-
Older learners with hearing or vision changes
-
Instructors who reuse and adapt materials quickly
These broad benefits make accessibility a strategic advantage. When content is built accessibly, instructors spend less time fixing problems later.
System-level urgency and practical risk
Delaying accessibility leads to higher retrofit costs and legal exposure. Retrofits often stall courses and increase vendor costs. Making accessibility part of your course design workflow keeps budgets predictable and supports accreditation and equity goals.
In practice, small upfront changes—clear headings, captions, transcripts, and flexible narration—pay off quickly. They reduce student friction, widen participation, and protect institutions from avoidable risk. Designing for inclusion now is both an ethical choice and a practical one.
Core principles: UDL, multimodality, and the role of voice & captions
Accessible design for learning starts with simple choices that help everyone. Universal Design for Learning, plain language goals, and smart use of media move instruction from one-size-fits-some to usable-by-many. This section explains UDL and why captions, transcripts, and voice matter for inclusive lessons.
UDL in plain language
UDL is a planning framework that asks instructors to offer multiple ways to engage learners, present content, and let learners show what they know. According to
CAST (2024), the UDL Guidelines are organized into three principles: Engagement, Representation, and Action & Expression. Put simply, design once to reduce barriers later. That means building choices into content, not adding fixes after a course is live.
How voice, captions, and transcripts help
Multimodal media supports UDL by giving learners more than one path to the same idea. Voice adds tone and pacing, captions provide reading support and clarity, and transcripts make content searchable and reviewable. Use these formats together to meet varied needs and learning styles.
Key benefits:
-
Boost comprehension for nonnative speakers and people with hearing loss.
-
Improve retention by aligning audio and text.
-
Make review and study faster with searchable transcripts.
-
Support note taking and flexible study schedules.
-
Offer alternative input for learners with attention or processing differences.
From accommodation to inclusive design
Switch the mindset from fixing to foreseeing. A simple three step shift:
-
Plan for multiple modes at lesson start, not after feedback.
-
Use auto-subtitles and transcripts to create parallel text and audio.
-
Offer voice options, like clear TTS or instructor audio, for varied pacing.
These steps cut retrofitting work and widen access from day one. When voice and captions are part of course design, instructors spend less time on one-off accommodations and more time on teaching.
Design workflow: Build an inclusive e‑learning module step‑by‑step
Start by working backward from what learners must do, not what the content is. This workflow turns goals into measurable checkpoints and accessible activities. It also shows where to map DupDub features so teams can prototype voice, captions, and transcripts fast.
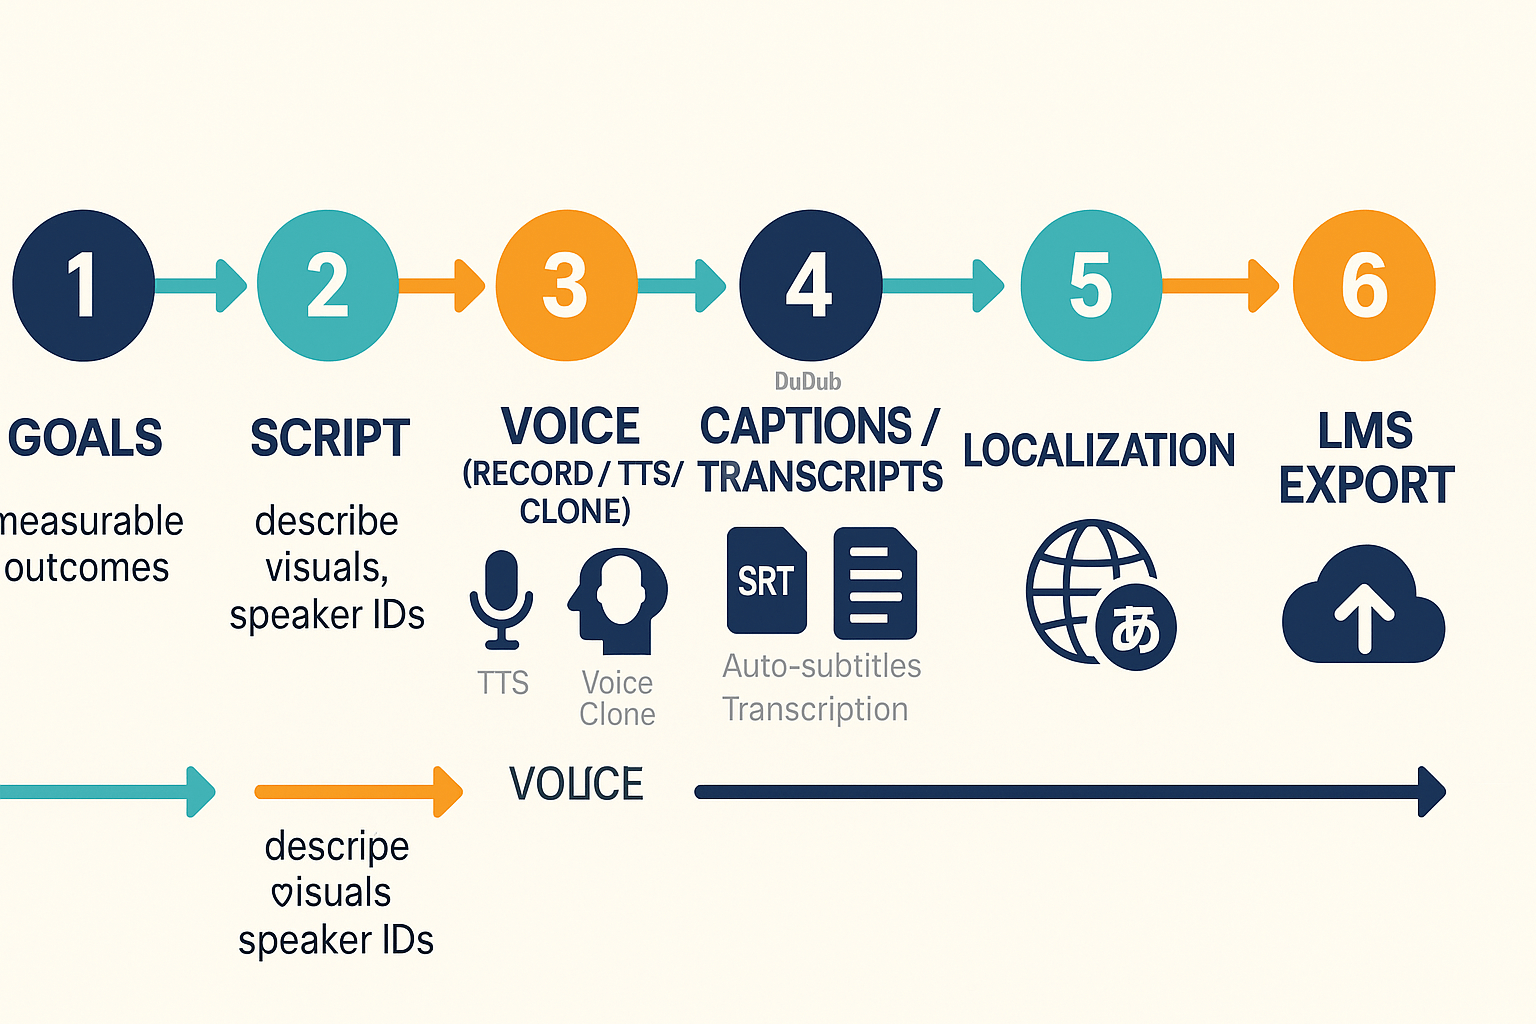
Step 1: Set measurable learning goals
Write 2–3 clear outcomes, using verbs you can test, like "describe," "compare," or "demonstrate." Attach a success metric, for example 80 percent of students will correctly label parts on a quiz. Checkpoint: a one-page learning objective doc that links to assessment items.
Step 2: Select multimodal activities
Choose at least two modes: text, audio, and visual. For example, pair a short narrated slide with an interactive transcript. Checkpoint: a table listing each activity, its mode, and the accessibility feature required (caption, transcript, alt text).
Step 3: Write accessible scripts and prompts
Keep narration scripts short and chunked. Describe visuals verbally and note speaker IDs for dialogs. Checkpoint: scripts that match slides and include speaker labels and sound cues for learners who use transcripts.
Step 4: Record or generate voice
Decide between live narration, TTS (text to speech), or a cloned voice. Use TTS for fast prototypes and voice cloning for a consistent instructor voice. DupDub fit: use DupDub TTS for quick narration, and DupDub voice cloning when you want the instructor voice across languages. Checkpoint: one sample module audio approved for clarity and pacing.
Step 5: Produce accurate captions and editable transcripts
Auto‑generate captions, then edit for accuracy and speaker labels. Provide a downloadable transcript in structured HTML. DupDub fit: use DupDub auto-subtitles and transcription to create aligned captions and editable transcripts quickly. Checkpoint: captions at 98 percent word match to script and proper speaker tags.
Step 6: Localize and test with users
Translate captions and voice as needed. For multilingual courses, dub or use translated TTS. DupDub fit: use DupDub AI dubbing and translated TTS to prototype localization. Test with at least three users from your target groups and collect task-based feedback.
Export and LMS integration
Export caption files (SRT), MP4, and HTML transcripts. Upload to your LMS and run the same assessment you planned in step 1. Checkpoint: successful LMS import and a baseline learner metric.
Follow these steps to prototype in one sprint. Keep checkpoints small and test often, and you’ll turn accessible design for learning into repeatable practice.
Tools & tech explained: How DupDub fits into accessible media workflows
Accessible design for learning depends on clear, synced audio and text alternatives. This section shows which tools fix common workflow gaps, and where AI features make work faster and cheaper. You’ll get practical maps from task to tool and quick LMS export tips.
Solve common workflow problems with the right tools
Many teams struggle with inconsistent captions, slow narration, and language reach. Use these tools to fix each problem quickly:
-
Text-to-Speech (TTS): Produce narrated tracks when live recording is costly. Good for fair-quality voice, many languages, and fast turnaround. It avoids booking studio time.
-
Voice cloning: Keep a consistent instructor voice for reused modules. Clone one voice and revoice translations or updates with little editing.
-
Auto-subtitles (auto-captions): Auto-generate time-aligned captions for videos. This cuts manual captioning time by hours per video while keeping sync intact.
-
Editable transcripts: Turn speech-to-text output into a clean, searchable transcript. Editors can correct errors and export polished captions or text handouts.
-
Multilingual dubbing: Translate and revoice content to reach learners in other languages. It expands access without full re-shoots.
Where DupDub modules fit and save time
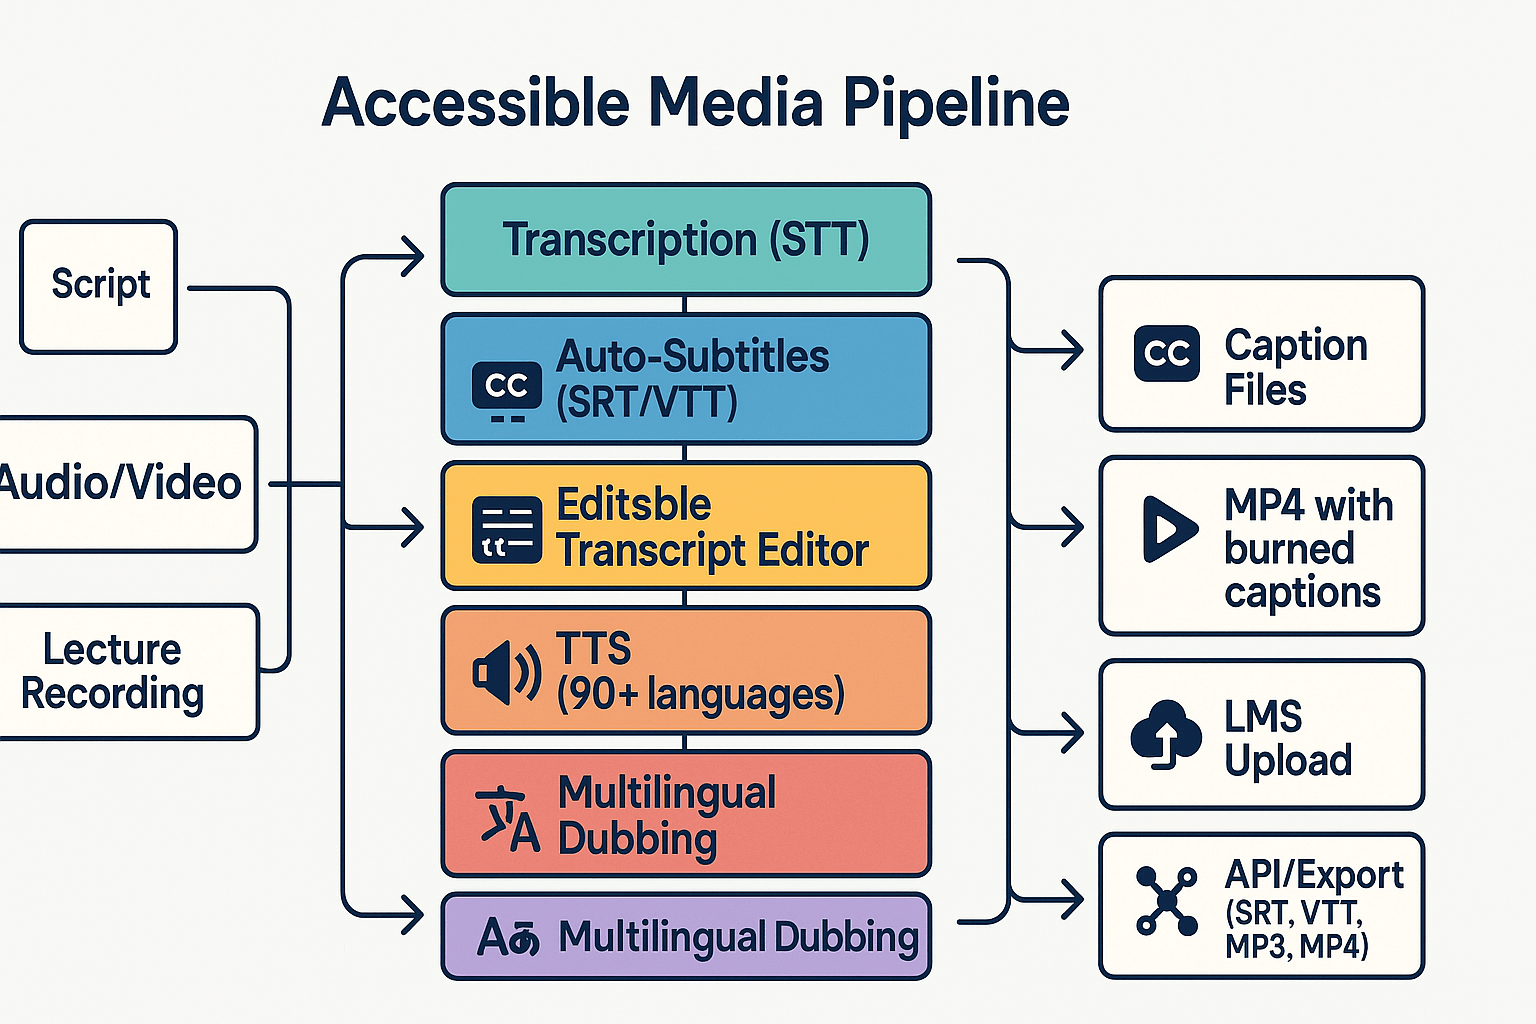
Map accessibility needs to DupDub features, then apply them in one pipeline:
-
Accessibility need: accurate captions and transcripts. Tool: DupDub auto-subtitles and speech-to-text. Benefit: fast SRT/VTT exports for captions and transcripts.
-
Need: narrated alternatives and language parity. Tool: DupDub TTS and multilingual dubbing. Benefit: reuse scripts to produce native-language audio in minutes.
-
Need: consistent instructor tone across updates. Tool: DupDub voice cloning. Benefit: faster updates, lower talent costs.
DupDub cuts time by automating alignment, caption generation, and revoicing. That lowers freelance dubbing costs and reduces postproduction hours.
Export and LMS integration tips
-
Export caption files as SRT or VTT, then upload to your LMS player. Most LMSs accept SRT or VTT for closed captions.
-
Export video with burned captions (MP4) when a player lacks caption controls.
-
Use transcript text as accessible HTML pages or downloadable TXT/HTML for screen readers.
-
If you automate at scale, use DupDub’s API to push captions and media into your content pipeline.
Three short, copyable examples (classroom & corporate)
Use these three compact templates to make media accessible fast. Each example maps voice, captions, and transcripts to clear steps. Apply these to your courses or training to meet accessible design for learning goals and reduce rework.
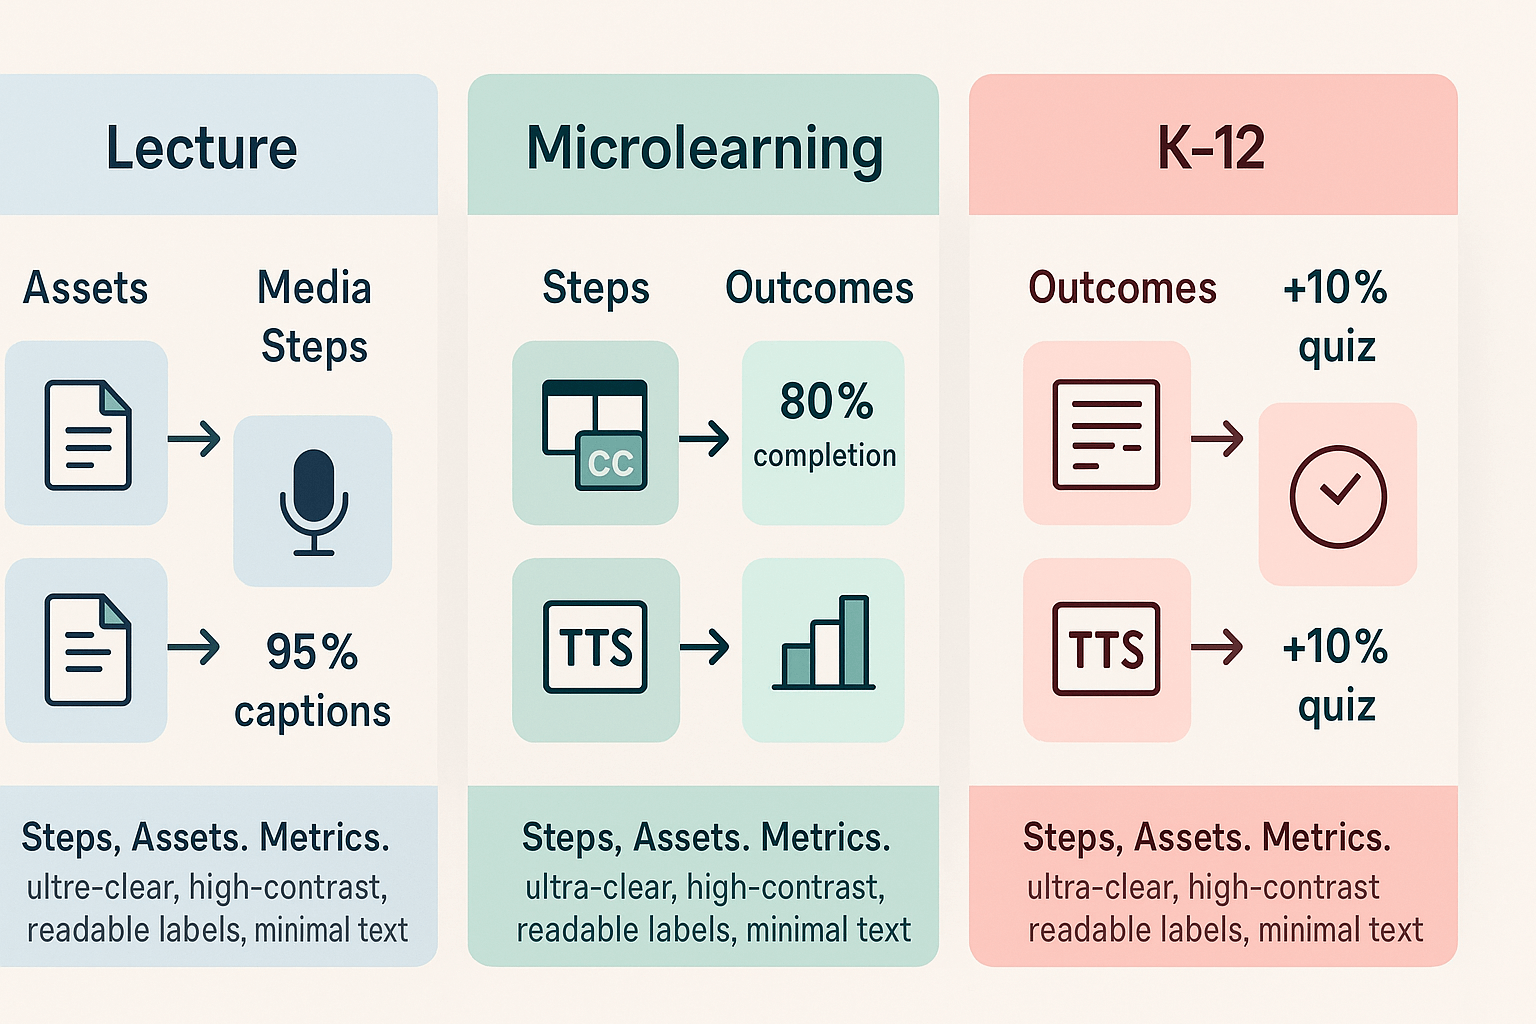
30-minute higher-ed lecture: quick redesign
Turn one lecture into a multimodal module in one class period.
Steps:
-
Record the 30-minute lecture audio, or upload existing video.
-
Auto-transcribe and auto-subtitle the file (edit for accuracy).
-
Create a short TTS (text-to-speech) version of the lecture highlights for review.
-
Produce a downloadable transcript with timecodes and topic headings.
-
Publish video with captions and a linked transcript.
Assets needed:
-
Lecture video or audio file
-
Slide deck as PDF or images
-
Short written summary (200 words)
-
Captioning/transcription tool (or DupDub for auto-subtitles and TTS)
Expected metrics:
-
Caption accuracy post-edit: 95% or better
-
Student review rate: 40 to 60% view transcript or TTS summary
-
Questions in office hours drop by 20% after transcript release
Microlearning compliance module: rapid micro-lesson
Make a 5-minute compliance clip accessible and track completion.
Steps:
-
Script a 5-minute microlearning video with 3 objectives.
-
Record or synthesize voiceover (use TTS or a short voice clone for consistency).
-
Auto-caption and translate subtitles if needed.
-
Attach plain-text transcript and short quiz.
-
Push to LMS and enable caption display by default.
Assets needed:
-
1 short script, 1 slide or visual
-
Voice asset: recorded or cloned voice (30 seconds sample for cloning)
-
Caption and transcript files (SRT and plain text)
Expected metrics:
-
Completion rate: 80% or higher
-
Quiz pass rate change: +10% after captions
-
Time to publish: under 2 hours per module
Scaffolded K–12 lesson: inclusive read-aloud
Adapt a 20-minute read-aloud for diverse learners.
Steps:
-
Record the teacher read aloud, or use a natural TTS voice.
-
Generate captions and a chunked transcript with comprehension prompts.
-
Create an audio-only version for listening centers.
-
Offer a slowed TTS voice and printable transcript for print-disabled students.
-
Collect quick exit tickets on comprehension.
Assets needed:
-
Book excerpt or short text
-
Audio file and edited captions
-
Printable transcript with prompts
Expected metrics:
-
Engagement: 50% more students using audio/text options
-
Comprehension score improvement: 5 to 15 percentage points
-
Time to adapt: 60 minutes or less per lesson
Measuring impact: simple metrics and quick evaluation methods
Start by picking low-burden signals you can collect from existing tools, then run short tests that fit your team schedule. Use the main learning metric plus two engagement signals and one accessibility quality check. That mix lets you tell whether accessible design for learning moved the needle without months of extra work.
Key low-burden metrics
-
View time and completion rate: average minutes watched per learner, and percent who finish a module. A 10 percent lift in view time is meaningful for recorded lessons.
-
Replay and seek behavior: percent of learners who replay a clip or jump back to sections. Replays signal confusion or high-value moments.
-
Pre/post quiz gains: percent improvement on the same short quiz before and after the module, or normalized gain ((post-pre)/(100-pre)). Run with n≥20 per cohort for quick signal.
-
Caption and transcript usage: clicks or toggles turned on, and downloads of transcripts.
-
Caption quality sampling: randomly check 10 short clips (30–60 seconds). Count transcription errors per 100 words, or use Word Error Rate (WER) if you can, and flag errors that change meaning.
Quick A/B and cohort tests you can run in weeks
-
Randomly assign two sections, A and B, with the same content: A gets captions and transcripts, B gets transcripts only. Run for one module, two weeks, and compare quiz gains and view time.
-
Feature release cohort: enable auto-captions for one instructor group, use another as control, measure replay rate and completion over 3 weeks.
-
Micro-survey: add a one-question pulse after the module asking whether captions helped comprehension. Combine responses with usage logs.
These quick checks tell you where to invest effort next: fix caption accuracy, add voice narration, or rethink pacing. Keep sampling regular, and track the same metrics month to month to show impact over time.
Common barriers to adoption and practical solutions
Accessible design for learning often stalls for predictable reasons: limited time, heavy workloads, unclear procurement rules, technical skill gaps, and privacy worries around voice cloning. This short section lists each barrier and gives tactical fixes teams can apply so a course or training cycle sees real progress within a semester.
Cut time and workload with role-based splits
Break big jobs into small, repeatable tasks, and assign by role. Faculty create or prioritize core content. Instructional designers (IDs) build templates and storyboards. Media specialists batch-record and run auto-subtitles. Students or TAs handle caption checks and edits. Benefits: faster delivery, predictable sprints, and fewer surprises.
Choose lightweight tools, start small
Pick tools that automate captions, transcription, and TTS (text to speech) so you avoid heavy editing. Run a 2-week pilot on one course module, use cloud auto-subtitles, and reuse voice files. Tip: require export to SRT and MP4 to keep content portable.
Short vendor checklist for fast procurement
Evaluate vendors on these practical points: free trial availability, export formats, language coverage, data security, and admin controls. Require a 2-week proof of concept and try the vendor with non-sensitive content first. That speeds approvals and meets many procurement policies.
Address privacy and voice-cloning consent
Use a simple consent workflow: written permission form, sample audio retention window, and an opt-out path. Store consent records with the project file. Limit voice cloning to volunteers and log cloning use for audits.
Semester-ready quick plan (6 steps)
-
Week 1: Pick one high-impact module and goals. 2. Week 2: Assign roles and run vendor pilots. 3. Week 3: Create templates and caption standards. 4. Week 4: Batch-transcribe and review captions. 5. Week 6: Integrate TTS or cloned voice if consented. 6. Week 8: Measure engagement and iterate.
These tactics remove the common blockers so teams can ship inclusive media within an academic or training cycle.
Implementation checklist & 30‑day quick start plan (role‑based)
This 30-day plan gives clear, role-based steps to deploy accessible media using voice, captions, and transcripts. It uses short tests in week one, then scales to course and campus levels. If you want to prototype fast, start DupDub’s 3-day free trial to prototype workflows; campus teams can schedule a demo for enterprise pilots, and consult the Accessibility‑First cluster pages for policy guidance.
Faculty: teach one accessible module in 30 days
Start small, prove impact, then expand. Week one: pick one lecture, record or upload audio, generate captions and a transcript, and test student comprehension and searchability. Days 8–14: add a cloned or TTS voice for alternate narration and publish an captions-on video. Days 15–30: collect feedback, fix timing or phrasing, and roll the approach into two more classes.
Practical checks:
-
Week 1 usability test with 5 students.
-
Accessibility checklist pass for captions and readable transcript.
-
Measure time saved on Q&A and clarity improvements.
Instructional designers: pilot, template, scale
Run a 30-day pilot with one course team. Week one: build a template that maps content to media roles and DupDub features: transcription, auto-subtitles, TTS, voice clone. Weeks 2–3: refine templates for pacing and metadata. Week 4: train faculty and hand off templates for full-course use.
Admins and L&D: enable and measure
Week one: enable accounts, grant starter credits, and run a security check. Weeks 2–4: approve workflows, collect usage metrics, and set KPIs like percent of videos with captions, transcript downloads, and student satisfaction.
Keep simple metrics: adoption rate, caption accuracy, and time to publish. Track these weekly and iterate.
FAQ — People also ask + answers (short, scannable)
-
How accurate are auto-generated captions?
Auto captions are fast but not perfect. Expect 85 to 95 percent word accuracy for clear audio, less for noisy recordings or heavy accents. Always run a quick edit pass, fix speaker labels, and publish corrected SRTs so learners can rely on them.
-
Are there ethics and safety rules for voice cloning?
Use voice cloning only with clear, documented consent from the speaker. Keep cloned voices locked to the original account and store samples securely. Add a disclosure in course notes, log voice use, and test cloned audio for mispronunciations and bias before release.
-
What simple UDL measurement methods work?
Measure three things: caption and transcript availability, learner access, and comprehension. Use percentage of videos with accurate captions, transcript download/view rates, and short post-module quizzes. These give quick signals about accessible design for learning and let you iterate.
-
Fast localization tips for courses
Start with auto subtitles and machine translation, then prioritize human review for key lessons. Use one consistent voice clone for narration to keep tone steady, and localize transcripts first for searchability. Pilot with one language, collect learner feedback, then scale.




 Discord
 YouTube
 Tiktok
 Twitter
 Facebook
 Instagram