TL;DR: What this guide covers
This guide shows content creators and teams how to add an AI voice to your design projects using a third-party dubbing platform. You get a clear, step-by-step setup, a side-by-side comparison with native voice tools, pricing and privacy notes, and quick next steps.
You'll see when a third-party voice tool is the best fit: when you need lifelike text-to-speech (TTS), voice cloning, multilingual dubbing, or flexible export formats with subtitle alignment. Ideal readers include creators, marketers, educators, small teams, and agencies who want faster, cheaper narration.
At a glance: faster turnarounds, consistent brand voice, wider audience reach, and export flexibility. Read on for a hands-on tutorial, sample scripts, short case studies, and a troubleshooting checklist to get started today.
What is the DupDub × Canva integration?
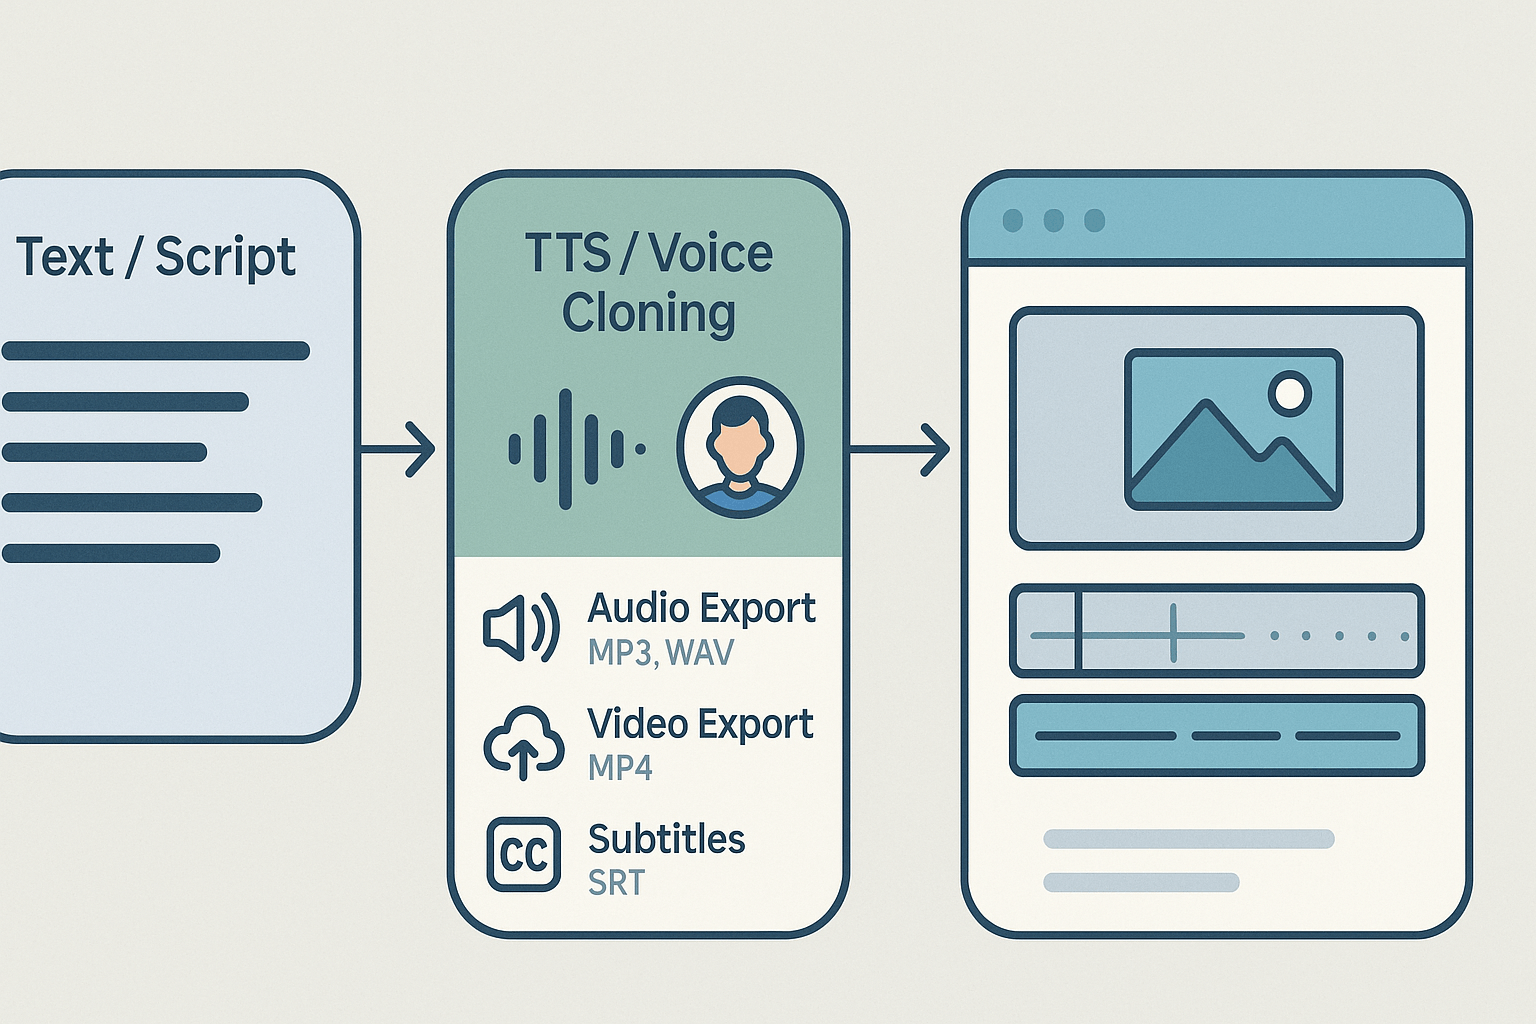
This integration lets you add AI voice to Canva projects by creating lifelike audio in DupDub and bringing it back into your Canva design. You can generate TTS, clone a brand voice, or dub full videos in many languages, then export audio as MP3 or WAV and drop it into Canva timelines. The goal is a smooth audio-to-design workflow that saves time and keeps voice quality consistent.
How the integration connects to Canva
DupDub hooks into Canva workflows in two main ways: export and import. Create or clone a voice in DupDub, export the finished audio file, then upload that MP3 or WAV into Canva. For video dubbing, you can export MP4 with audio or export separate audio and SRT subtitle files for precise re-syncing inside Canva.
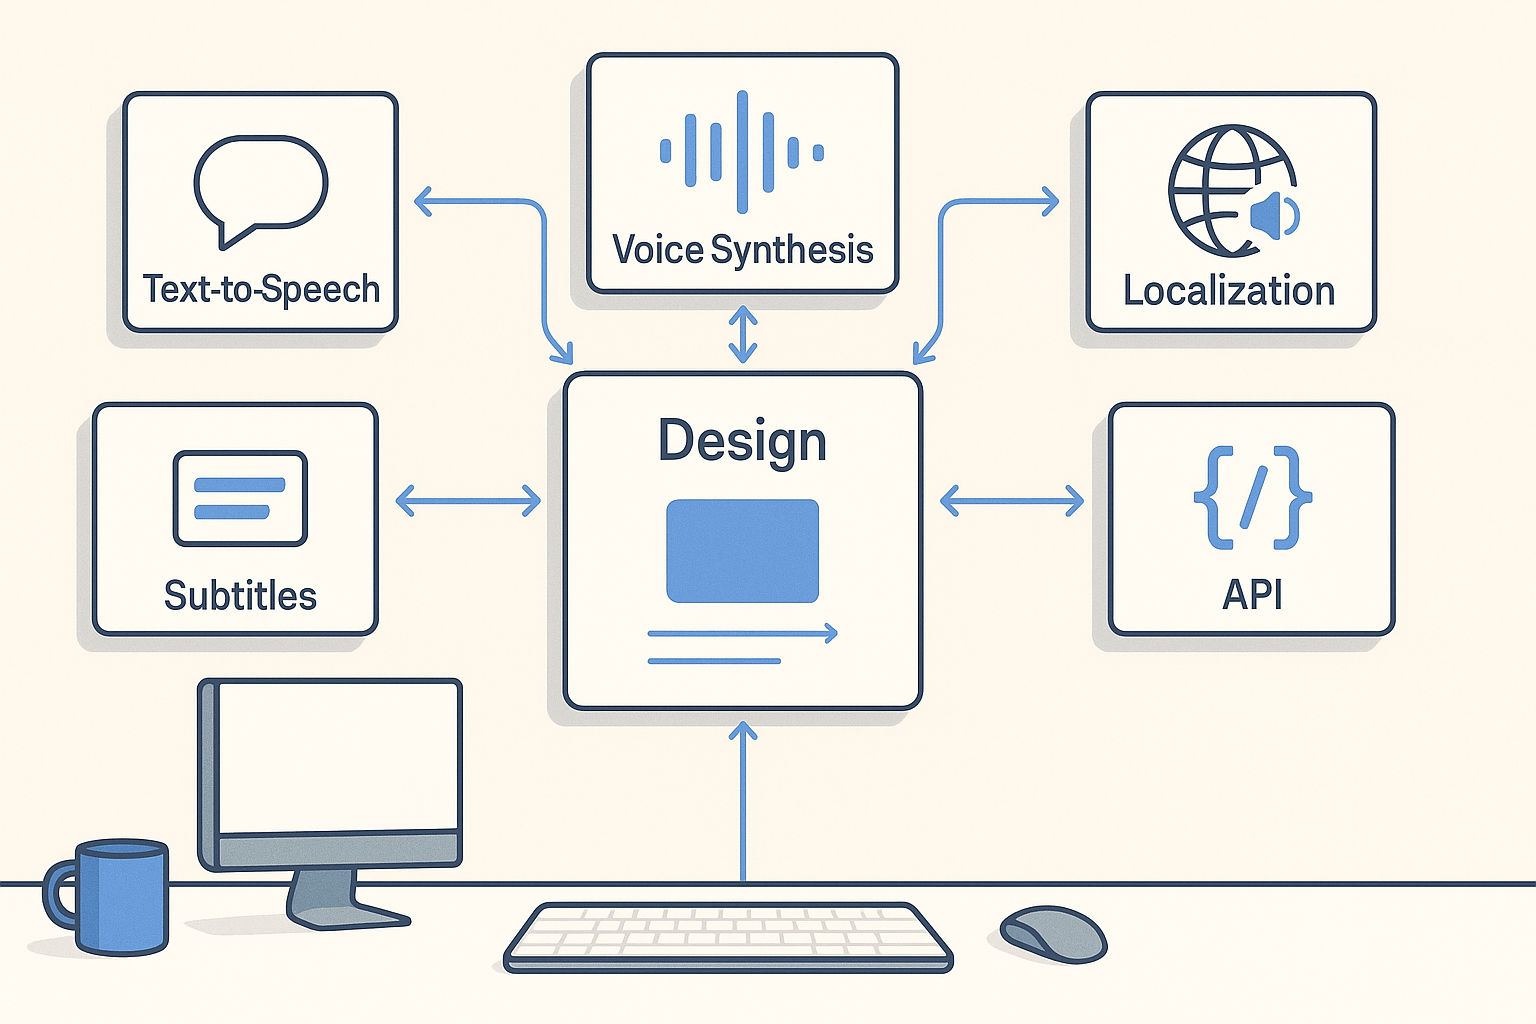
Core DupDub modules you’ll use
-
Text-to-Speech (TTS): Convert script text to natural speech with many styles.
-
Voice cloning: Create a custom synthetic voice from a short sample (consent required).
-
AI dubbing: Translate and re-voice videos, with subtitle alignment.
-
Subtitles and SRT export: Auto-generate, edit, and export subtitle files.
-
Avatars and talking photos: Optional visual assets that pair with audio.
-
API and exports: Automated workflows and direct file output for editors.
These modules act as blocks you can mix and match. Use TTS for quick narration. Use cloning for brand consistency across videos and languages. Use dubbing when you need translated voice tracks and synced captions.
Supported languages and file formats
DupDub supports TTS in 90 plus languages and accents, and voice cloning in 47 languages. Export formats include MP3 and WAV for audio, MP4 for video, and SRT for subtitles. Those formats plug straight into Canva without conversion for most projects.
What DupDub adds to Canva’s native toolkit
-
Deeper voice variety: hundreds of voices and advanced speech styles.
-
Brand voice cloning: keep a consistent narrator across platforms.
-
Multilingual dubbing: one workflow to localize a video in many languages.
-
Subtitle alignment: export ready-to-use SRT files for accurate captions.
-
API and batch exports: scale production beyond manual downloads.
Privacy note: cloned voices are tied to the original speaker and processed securely. Always get consent before creating a voice clone and store approvals with your project records.
Why add an AI voice to Canva? Benefits & common use cases
This section explains the practical wins of AI narration inside design tools. Many creators choose to add ai voice to canva because it speeds up production, scales language reach, and improves accessibility. Read on for concrete examples and quick ROI ideas that make testing a voice tool worth your time.
Faster production and lower cost
AI voices cut the back-and-forth of hiring, recording, and re-recording. With AI TTS (text-to-speech), you can generate clean narration in minutes and iterate in real time. That saves hours per video and lowers per-video cost compared with studio sessions.
-
Produce drafts in minutes instead of days.
-
Re-voice edits without new recording sessions.
-
Export ready audio (MP3, WAV) or integrated video files.
Scale multilingual content and repurpose assets
Translating and dubbing used to be high effort and high cost. Now you can create one script and output many language tracks quickly. That lets social creators, marketers, and e-learning teams reuse the same video for global audiences.
-
Social shorts: make localized versions of the same clip for different markets.
-
E-learning narration: export voice tracks and subtitles for LMS uploads.
-
Ads and promos: test voice-tone variants across regions.
Improve accessibility and learner experience
AI narration plus captions helps more people access your content.
WCAG 2 Overview (2025) states the Web Content Accessibility Guidelines (WCAG) 2.2, published on 5 October 2023, include 13 guidelines organized under four principles: perceivable, operable, understandable, and robust. Pairing voice with accurate subtitles and clear pacing supports those principles and improves comprehension for non-native speakers.
Typical ROI and workflow wins
Teams measure ROI by time saved, faster publishing, and higher engagement. A common outcome is faster turnaround and fewer revisions, which cuts production cost and lets creators publish more frequently. The real value is consistent brand voice across languages and platforms.
-
Before: record in-studio, schedule voice talent, sync audio, revise multiple times.
-
After: generate voice from script, tweak tone, export audio or MP4 with subtitles.
-
Result: publish faster, test more variations, reach more viewers.
AI voice in Canva-style workflows gives creators a practical path to scale. It shortens timelines, lowers per-video cost, and improves accessibility. That combination makes it easy to see why teams test an AI voice tool alongside their design workflow.
Step-by-step: How to add AI voice to Canva using DupDub
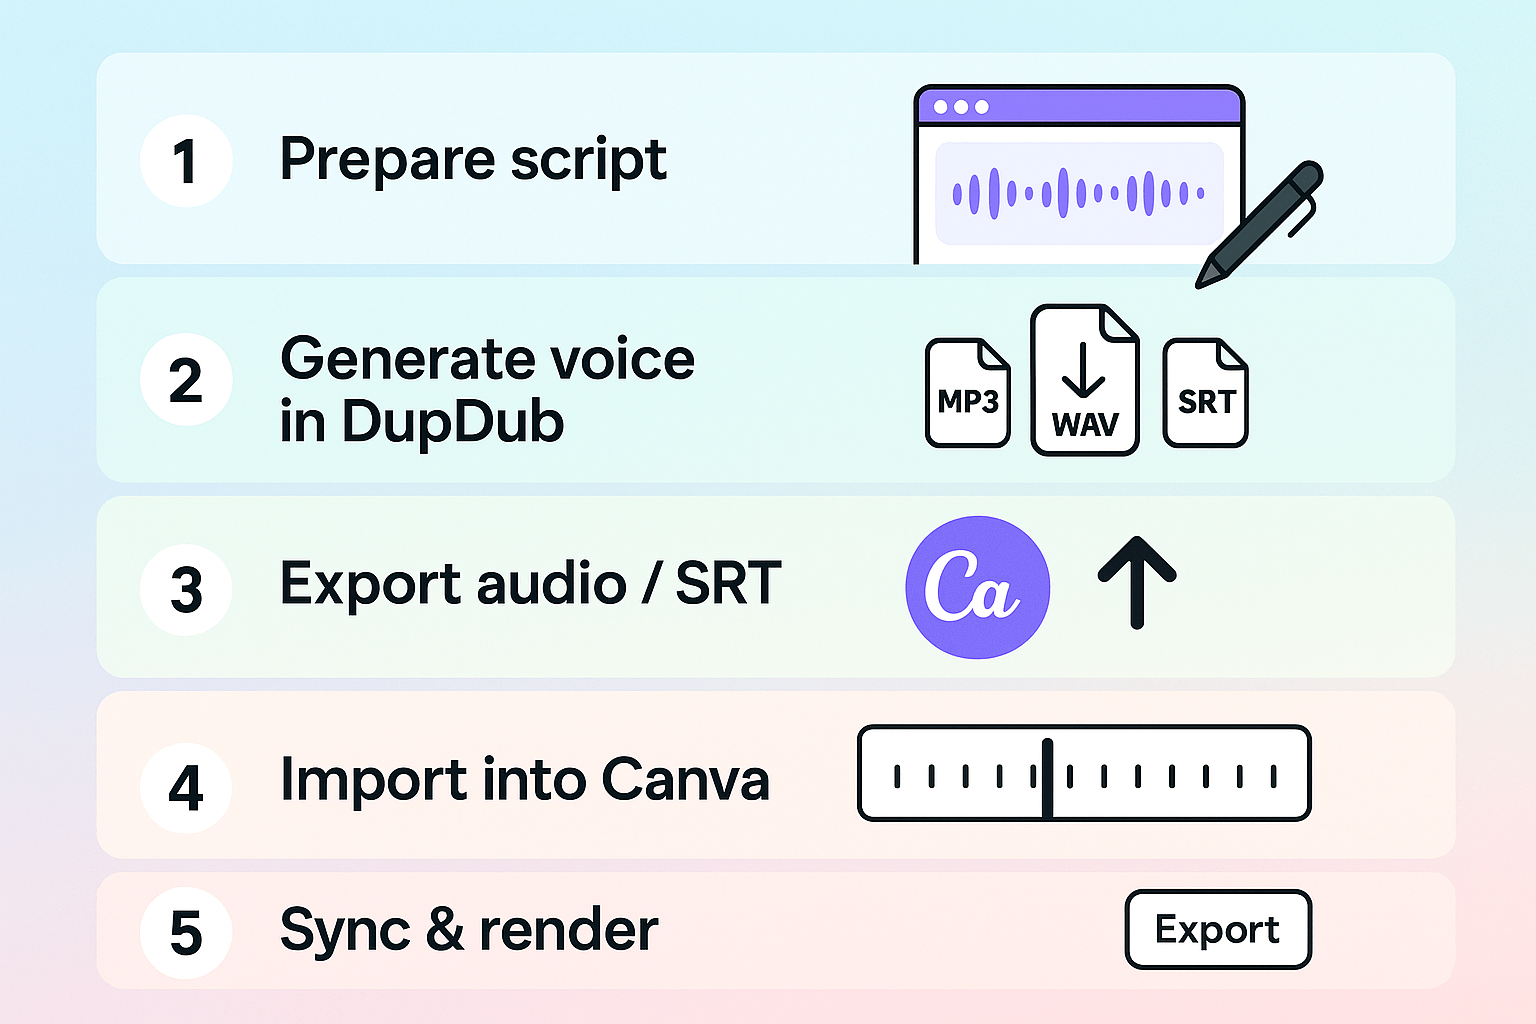
This hands-on guide shows each action you need to add ai voice to canva by using DupDub. It covers the prerequisites, installing and authorizing the Canva integration, preparing scripts and assets, generating voice audio in DupDub, exporting MP3/WAV or SRT, and best practices for importing and syncing in Canva before final render.
Prep: accounts, credits, and files
Create both a DupDub account and a Canva account. Make sure you have DupDub credits for generation, even the free trial works for testing. Gather your script as plain text and any video or image assets you plan to use in Canva.
Install and authorize the DupDub Canva integration
-
Open Canva and go to Apps in the left sidebar.
-
Search for DupDub and click Install or Use app.
-
When prompted, sign in to DupDub to authorize the connection.
-
Grant only the permissions needed for audio import and file access.
Authorization uses OAuth, so you’ll be redirected to DupDub to confirm. Once authorized, the DupDub app appears inside Canva under Apps or Uploads.
Prepare your script for narration
Write short, natural sentences with clear punctuation. Break long paragraphs into lines that match visual cuts or scene changes. Add notes for tone or pauses in brackets, for example: [warm, friendly], or [0.6s pause]. Save the script as a TXT or copy it to DupDub’s studio.
Sample narration line: "Welcome back, everyone. Today we’ll show a 60 second product demo."
Generate voices in DupDub: pick voice, language, and style
-
In DupDub, create a new TTS or dubbing project.
-
Paste or upload your script into the editor.
-
Choose language and accent from the 90+ options.
-
Pick a voice from the 700+ voices and set a speaking style.
-
If you need a brand voice, use voice cloning (upload a 30 second sample).
-
Preview short chunks, then render the full audio.
Keep previews short and test cadence. Use Ultra voices for higher fidelity if you have credits and need realism.
Export audio and subtitles from DupDub
Export options you’ll need in Canva workflows are MP3 or WAV for audio. Export SRT for subtitles and timing data. Export steps: render audio, then choose Download > MP3 or WAV. For subtitles, choose Export > SRT. Save files with clear names like project_v1_narration.mp3 and project_v1_captions.srt.
Import and sync in Canva
-
In Canva, open your design or video project.
-
Upload the MP3/WAV under Uploads > Audio.
-
Upload the SRT under Uploads > Text > Upload subtitles or drag the SRT onto the video timeline.
-
Use Canva’s timeline to place the audio, trim clips, and nudge timings by 0.1s when needed.
-
If you don’t have an SRT, split audio across scenes and place lines manually.
Use the waveform and playhead to align mouth movements or scene changes. Apply small fades to avoid abrupt starts and ends.
Integration workflow and quick checklist
-
Create assets and final script first.
-
Generate voice and exports in DupDub.
-
Import audio and SRT into Canva.
-
Sync audio, adjust timing, add captions, then render.
Checklist: account connected, enough DupDub credits, correct language and voice, SRT exported, audio trimmed, captions matched.
Best practices for smooth results
-
Match sentence breaks to video cuts to simplify syncing.
-
Use shorter sentences for higher clarity in AI speech.
-
Test two voices and pick the better fit for your brand.
-
Choose WAV for editing, MP3 for smaller final files.
-
Keep one master script and versioned exports to avoid confusion.
Integration workflow & technical considerations
This section lays out the file formats, size and duration limits, automation choices, and privacy steps teams must check before they add ai voice to canva. It explains how audio, subtitles, and cloned voices move between DupDub and Canva, and what to lock down for compliant, repeatable workflows.
Supported export and import formats
Start by standardizing file types for your pipeline. Use these exports when working between DupDub and Canva:
-
Audio: MP3 (compressed delivery), WAV (editing, highest fidelity).
-
Video: MP4 (final video with embedded audio).
-
Subtitles: SRT (timed captions for upload to Canva or video hosts).
Check plan limits and project needs: many teams export WAV for mixing, then render MP3 or MP4 for final upload. If you expect long videos, split uploads into logical chapters, since some browser editors slow with very large files.
File-size, duration and alignment tips
Cloud editors and browsers vary in how much they accept. As a rule:
-
Keep single audio files under 1 GB for smooth browser upload. Split longer recordings into 10 to 30 minute chunks.
-
For subtitles, export SRTs with proper frame rates and UTF-8 encoding.
-
Maintain consistent sample rates (44.1 or 48 kHz) to avoid sync drift when combining tracks.
Also include clear filenames and timecode metadata so automated steps can match audio to scenes in Canva.
Automation and bulk workflows
If you need scale, automate repetitive steps:
-
API access: programmatic TTS and cloning lets you generate batches of audio and SRT files, then push MP4s back to a CMS or to Canva via uploads.
-
Bulk upload: use CSV or ZIP packages with assets and SRTs for multi-video projects.
-
Integrations: browser or platform plugins speed one-off transfers when you don’t need full automation.
Design your pipeline to handle rate limits, retries, and backoffs. Cache generated audio to avoid re-rendering the same lines.
Voice cloning consent and privacy safeguards
Be explicit about permission when you clone a voice. According to
When is consent valid? - European Commission (2026), the GDPR requires that consent must be freely given, specific, informed, and unambiguous, with individuals being clearly informed about the processing of their personal data, including the identity of the organisation processing the data, the purposes of the processing, and the type of data being processed. Apply these rules to voice cloning: store signed consent, document intended uses, and limit exports to approved formats. Prefer encrypted processing and access controls, and record retention policies that reflect regional compliance requirements.
Quick checklist for teams
-
Confirm export formats (MP3, WAV, MP4, SRT) and sample rates.
-
Verify file-size and duration limits for your plan and browser editor.
-
Choose API or bulk paths for scale, add retries and caching.
-
Collect explicit voice-cloning consent and log it.
-
Test one full round trip: script to TTS, SRT alignment, import to Canva, final render.
Real-world use cases and short case studies
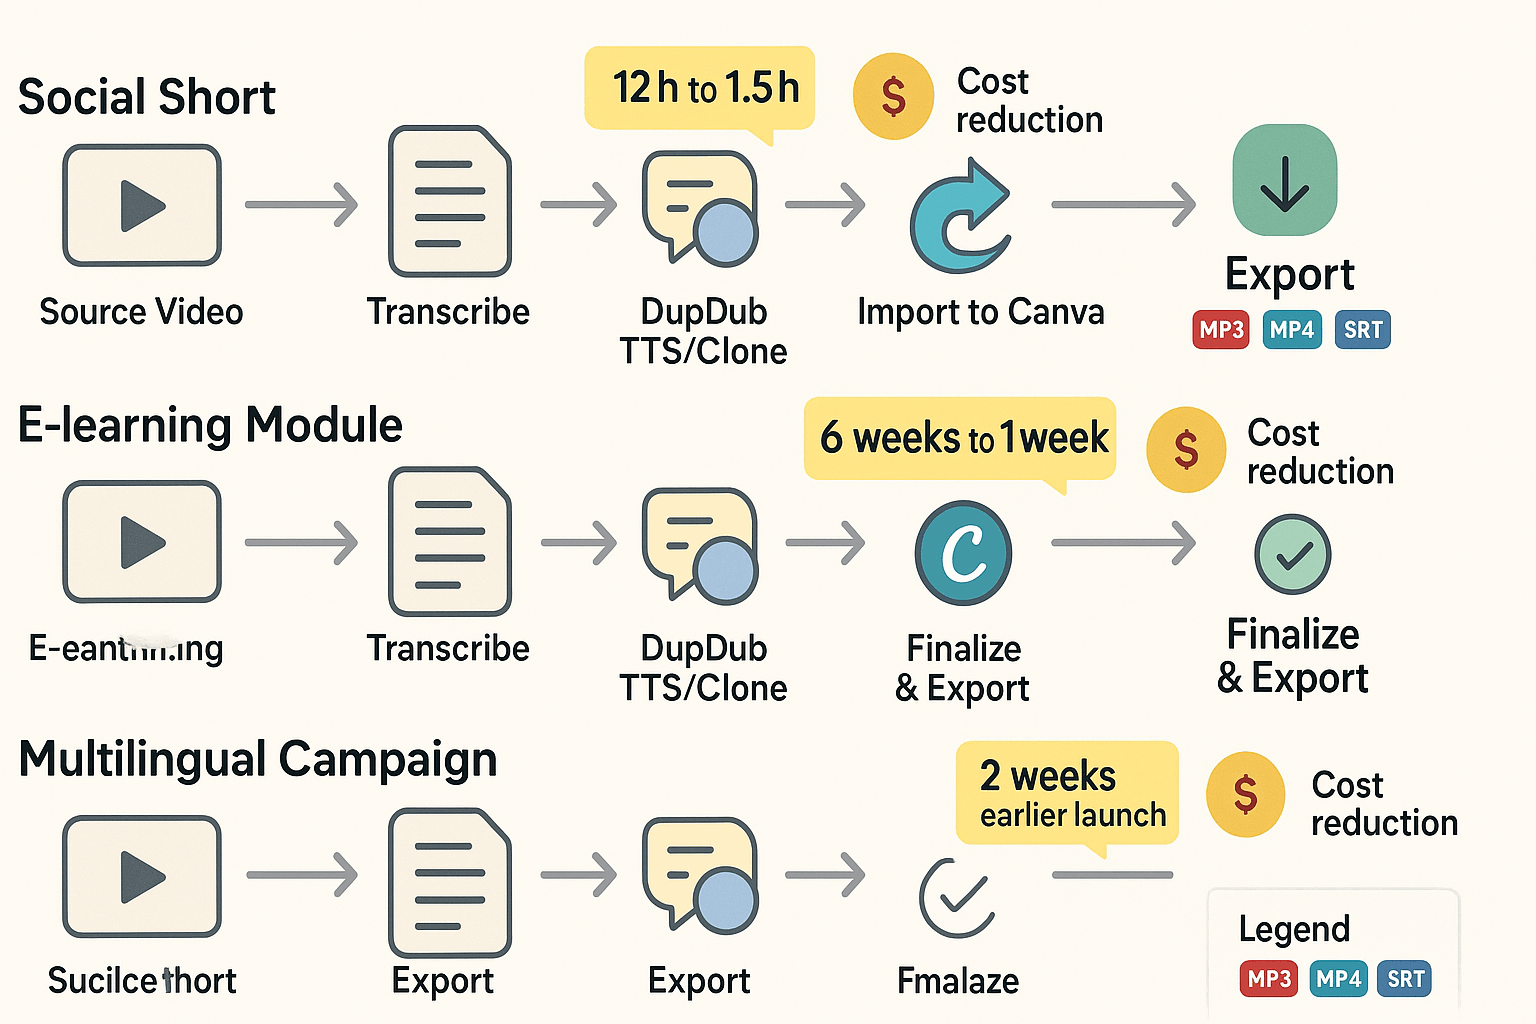
This section shows three short case studies that explain how teams add ai voice to canva using DupDub, what workflow they used, and the real results they saw. According to
Areas Of Positive ROI From Generative AI Are Now On Par With Predictive AI (2024), 51% of global AI decision-makers reported positive ROI in top-line benefits from their investment in generative AI in the last 12 months. Read these mini-cases to map the pattern to your project and decide if a trial or pilot makes sense.
Creator: Social short production, 10x faster turnaround
Problem: A solo video creator needed daily short clips from long livestreams. Manual editing and human voiceover slowed them down and added cost. They wanted consistent voice and fast publishing.
Workflow used with DupDub and Canva:
-
Export transcript from livestream.
-
Generate a lifelike TTS narration in DupDub and create a short MP3.
-
Upload audio to Canva, sync with edited clip, and add captions.
Outcome: Turnaround dropped from 12 hours to 90 minutes per short. Voice consistency increased across videos, and production cost fell by about 70 percent compared to hiring freelance voice talent. The creator reallocated saved time to ideation and grew output by 3x.
E-learning team: Module localization in 8 languages, major cost cut
Problem: An instructional designer needed to localize a 45-minute training module. Traditional dubbing and QA took weeks and large budgets. The team needed faster review cycles.
Workflow used with DupDub and Canva:
-
Export slides and original audio from Canva.
-
Transcribe and auto-translate in DupDub, then generate native TTS voices per language.
-
Export MP4 or MP3, import back to Canva for subtitle styling and final layout.
Outcome: Localization time fell from six weeks to one week per language. The team cut vendor costs by roughly 80 percent and shipped modules to learners faster. Review cycles shortened because reviewers played synced audio plus styled captions in Canva, which simplified sign-off.
Marketing team: Multilingual campaign, consistent brand voice at scale
Problem: A regional marketing team needed ads and short explainers in five markets. They wanted the same brand voice and fast iteration across copy variants.
Workflow used with DupDub and Canva:
-
Draft ad scripts in English inside Canva notes.
-
Bulk export scripts to DupDub for multilingual TTS and voice clones of the in-house presenter.
-
Import localized audio back to Canva, pair with localized creative, and batch export assets for each market.
Outcome: The campaign launched two weeks earlier than planned. Creative variants went live in five markets with a single cloned voice for brand consistency. The team replaced the need for multiple on-location voice sessions and cut production headcount required for localization.
Patterns to copy
-
Always start with a clean transcript. It speeds TTS tuning and subtitle alignment.
-
Use voice cloning for a single brand voice across markets. Keep consent records for any cloned speaker.
-
Export MP3 for audio-only use, MP4 for video, and SRT for captions. That keeps assets reusable.
Before vs after: one quick narrative
Before, a mid-size agency scheduled three weeks per market for dubbing and revisions. After adopting DupDub plus Canva, the agency completed the same work in four days and reused the same audio files across 10 short formats. The net effect: faster launches and lower per-asset cost, with consistent voice across channels.
These short case studies show repeatable steps you can adapt. If you want to replicate the pattern, start with a short pilot: pick one video, create a transcript, generate a TTS voice in DupDub, and import the audio to Canva for styling and export.
Best practices: Choosing voices and writing scripts for AI narration
Good narration starts with intent. This section shows how to pick a voice that fits your brand and how to write short scripts that sound natural when you add ai voice to canva. You’ll get a checklist, mixing tips for music and effects, and ready-to-paste sample scripts for DupDub.
Pick voice tone, accent, and emotion for brand fit
Start by defining your brand voice: friendly, authoritative, playful, or calm. Match that label to tone and pacing: friendly = warmer tone and medium pace, authoritative = lower pitch and slower cadence. Consider audience locale when choosing accents to avoid distraction.
Practical tips:
-
Test 3 voices per project, then narrow to 1 that reads your brand consistently.
-
Use neutral accents for global audiences, local accents for targeted markets.
-
Choose subtle emotion tags like "warm" or "confident" rather than extreme labels.
-
For talky tutorials, pick clearer enunciation over stylistic breathiness.
Script-writing checklist (make AI sound human)
Good scripts are short, spoken, and paced. Write like you talk and use punctuation as audio cues. Below is a step-by-step checklist you can follow when preparing narration for DupDub and Canva.
-
Keep lines to 8 to 14 words each, split by natural pauses.
-
Aim for 60 to 90 spoken words per minute for tutorials.
-
Use commas for short pauses, ellipses for longer breathy pauses, and dashes only in writing (avoid them in narration cues).
-
Mark emphasis with ALL CAPS sparingly, or wrap stressed words in asterisks if the tool supports SSML (speech synthesis markup language).
-
Read scripts aloud once, time them, then trim filler.
Mix AI voice with music and sound effects
Balance is the goal: voice should sit on top of music. Lower background music by 12 to 18 dB during speech. Use ducking (automated volume reduction) to keep vocal clarity.
Mixing quick rules:
-
Start and end music 0.5 to 1 second before and after speech.
-
Add subtle SFX for transitions only, not under every line.
-
Normalize final audio to -1 to -3 dB peak and check on headphones.
Sample scripts to paste into DupDub
Short explainer (30s): "Welcome to our quick guide. In thirty seconds you will learn three tips to improve your thumbnails and increase views. Try them today and see faster growth."
Social hook (12s): "Want more clicks? Try one quick caption test and watch engagement climb."
E-learning intro (45s): "Hi, I’m Alex. In this lesson you’ll learn how to map customer journeys. Follow the steps and pause the video to practice each exercise. Ready? Let’s begin."
Pricing, limits & how DupDub compares to Canva native voice and competitors
This section breaks down costs, feature trade-offs, and practical advice for teams who want to add ai voice to canva projects. Read it to decide when DupDub makes sense, when a native Canva voice is enough, and when another vendor is a better fit. Expect clear guidance on trialing plans, cost per minute, and when to contact sales.
Snapshot: how the pricing tiers line up
According to
DupDub Pricing Plans & Top Alternatives in 2026, DupDub's Personal plan costs $11 per month when billed annually and includes approximately 2 hours of voiceover, a low-cost entry for solo creators and small projects. Below is a feature-focused comparison to help you weigh options quickly.
|
Provider
|
Price example
|
Voices & languages
|
Voice cloning
|
Avatars
|
API / bulk export
|
Common exports
|
|
DupDub (example)
|
Personal $11/mo (annual)
|
700+ voices, 90+ languages
|
Yes, 30s sample
|
Yes
|
API, bulk credits
|
MP3, WAV, MP4, SRT
|
|
Canva native TTS
|
Included in Pro tiers
|
Dozens of voices, fewer accents
|
No
|
No
|
Limited export, design-first
|
MP3, in-project audio
|
|
Competitors (ElevenLabs etc.)
|
Varies: free tiers to $30+/mo
|
High-quality voices, smaller catalogs
|
Select vendors offer cloning
|
Some offer avatars
|
API varies by vendor
|
MP3, WAV, some video
|
What you get at each DupDub price band
DupDub offers a free 3-day trial with starter credits. Paid tiers scale credits, cloning slots, and avatar hours. Personal and Professional tiers include fixed yearly credits for TTS and avatars. Pay-as-you-go credits are available for one-off needs, which helps control cost when projects vary. For teams that need volume or custom SLAs, the Ultimate plan and enterprise discussions unlock higher limits.
Cost per minute and budget tips
Estimate cost per minute by mapping credits to output minutes. DupDub lists per-plan credit bundles and estimated hours for standard and ultra voices, so divide your credit hours by expected minutes. If you need predictable monthly spend, pick a plan with enough yearly credits. If you publish occasionally, buy pay-as-you-go credits to avoid idle monthly fees.
Practical tip: use standard TTS for drafts and ultra or cloned voices for final cuts. That saves credits while keeping quality high for important outputs.
When to choose DupDub over Canva native or others
-
Choose DupDub if you need voice cloning for brand consistency (create voice clones from short samples).
-
Use DupDub when you need many voices, wide language coverage, or talking avatars for localization.
-
Pick DupDub when you require API access or bulk exports for batch localization pipelines.
-
Stick with Canva native TTS for quick social posts, simple narration inside a design, or when cost must be zero and requirements are minimal.
-
Try specialized competitors when audio fidelity is your primary goal and you only need single-speaker TTS without localization or avatars.
Trialing and knowing when to contact sales
Start with the free 3-day DupDub trial to import a short Canva video and test cloning and avatars. Measure credits used for a representative video to project monthly cost. Contact sales when you need SSO, higher concurrency, custom privacy terms, or volume discounts. Enterprise talks are also right if you need on-prem or audited compliance guarantees.
Bottom line
DupDub trades a modest subscription cost for large voice variety, cloning, avatars, and API scale. Canva native voice wins for speed and simplicity inside the design flow, but it lacks cloning and full localization features. For creators and teams that localize, clone brand voices, or automate dubbing at scale, DupDub usually delivers better value.
FAQ (includes troubleshooting & common issues)
-
Can I add AI voice to Canva and keep audio in sync?
Yes. Export timecoded audio or an MP4 from DupDub and import it into Canva. Match frame rate and sample rate between tools. If minor drift occurs, use SRT subtitles or adjust clip timing manually inside Canva.
-
How do I fix audio quality issues when adding voice to Canva?
Use WAV or high-bitrate MP3 exports, ideally at 44.1 kHz or 48 kHz. Remove noise, normalize volume in DupDub before export, and avoid clipping or distortion by checking levels before importing into Canva.
-
What consent do I need for voice cloning and privacy?
Always obtain written consent from the speaker before creating a voice clone. Store both the signed agreement and the original sample. Cloned voices should only be used within the agreed scope and platform terms.
-
Can I use DupDub voices commercially in Canva projects?
Yes, most DupDub plans allow commercial use, but you should verify your specific plan terms. Keep records of licensed assets and ensure all voice and media rights are cleared for client or public delivery.
-
Where can I get help, developer docs, or API support for the integration?
Use DupDub’s in-app support or ticket system for account issues. For automation and integration, refer to the developer documentation and API reference in the dashboard. Include a sample file when reporting issues.




 Discord
 YouTube
 Tiktok
 Twitter
 Facebook
 Instagram