

TL;DR: What you need to know about audio output formats for AI dubbing
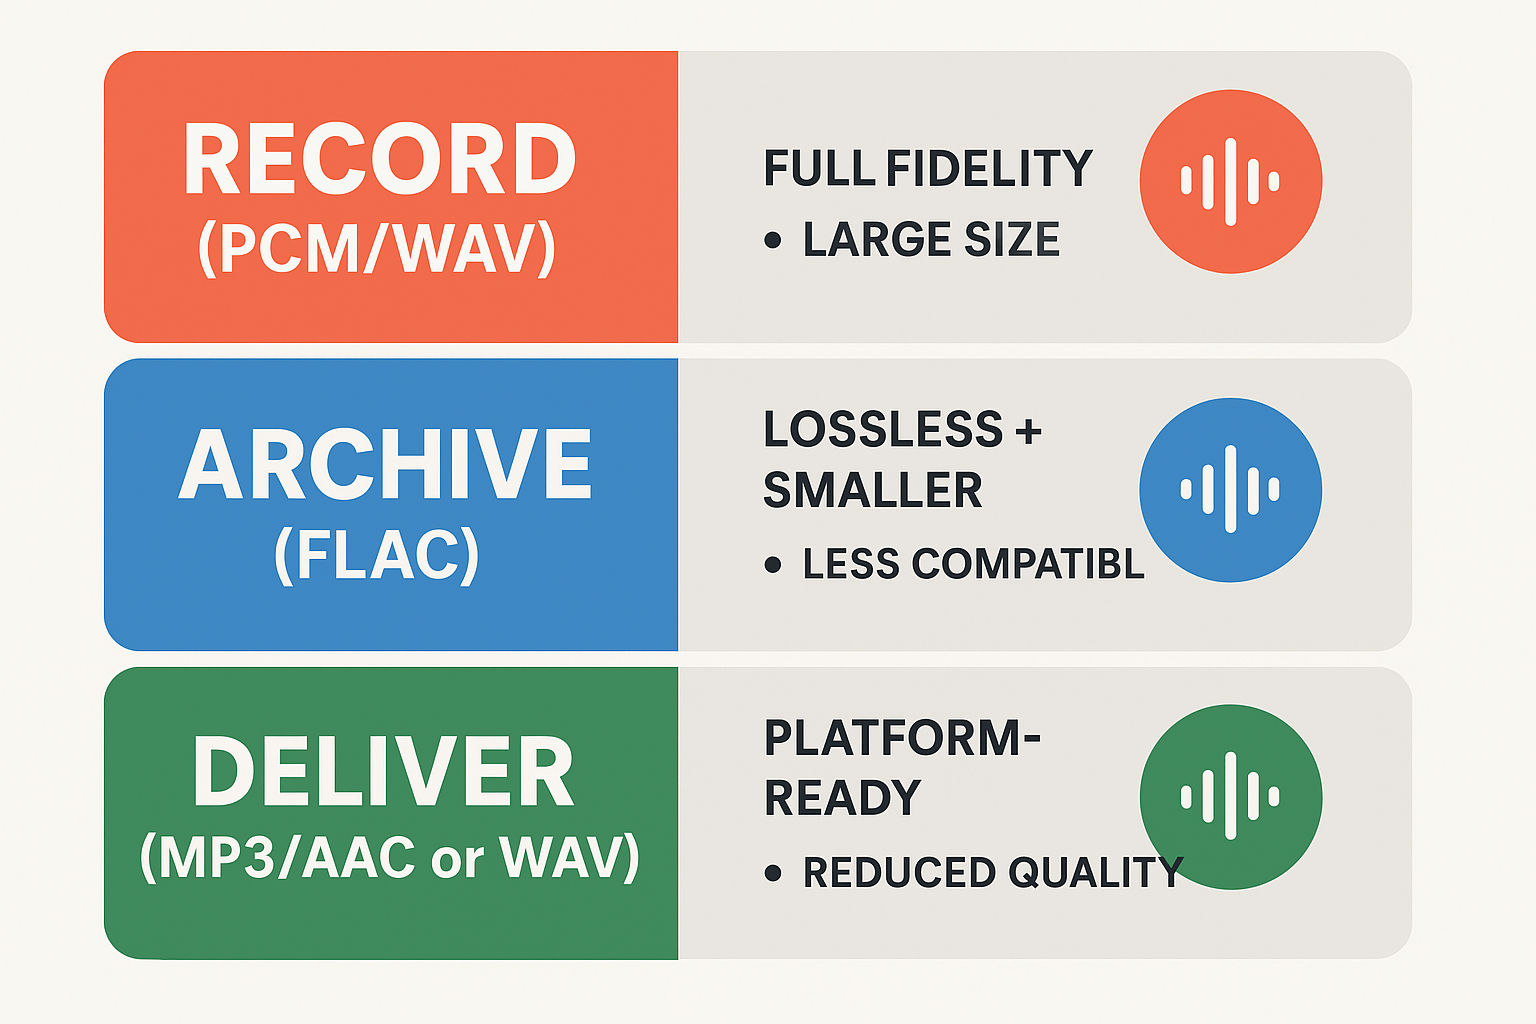
Record masters in PCM/WAV whenever possible. These uncompressed files keep all audio detail, which helps neural TTS and alignment tools produce cleaner, more natural dubs. Use a 48 kHz sample rate and 24-bit depth for video projects, and mono for single-voice podcasts when appropriate.
Archive working masters in lossless FLAC to save space while preserving quality. For final delivery, pick the format that matches the platform: MP3 or AAC for streaming and social, WAV for high-quality delivery or further editing. Keep stems (dialogue, SFX, music) separate.
Quick pros and cons:
-
WAV/PCM: Pro, full fidelity and simple; Con, large files.
-
FLAC: Pro, lossless and smaller; Con, less universal for delivery.
-
MP3/AAC: Pro, small and widely supported; Con, lossy artifacts can hurt TTS alignment.
-
Opus: Pro, great low-bitrate quality; Con, limited delivery support on some platforms.
Export checklist: deliver 48 kHz, 24-bit WAV for AI dubbing input, use normalized loudness targets (-16 LUFS for stereo podcasts), and avoid aggressive filtering or heavy compression before TTS. Test your pipeline with a short clip before batch processing.
What are audio output formats? Codecs vs containers, lossy vs lossless
Audio output formats describe how sound is stored and moved between tools. For AI dubbing and TTS workflows, the term covers both the codec that compresses audio and the container that wraps it. Knowing the difference helps you choose files that keep quality, metadata, and sync intact.
Codec versus container: simple rules
A codec is the algorithm that encodes and decodes audio data. Examples include PCM (raw), MP3, AAC, Opus, and FLAC. Codecs determine compression, audio fidelity, and decoding cost.
A container is the file wrapper that holds one or more codec streams plus timing and metadata. Containers store tracks, subtitles, chapters, and metadata, and the ISO base media file format ISO/IEC 14496-12:2022 defines a general structure for files holding time-based media. Common containers include WAV, MP4, and MKV.
Quick differences, in one list:
-
Codec: controls how sound samples are represented and compressed.
-
Container: bundles streams, timings, and metadata like language tags.
-
You can have multiple codecs inside one container, but not every player accepts every pair.
Lossy, lossless, and uncompressed explained
Lossless formats compress audio without losing samples. FLAC and ALAC are examples. You get smaller files and exact playback of the original.
Lossy formats throw away some information to cut file size. MP3, AAC, and Opus are common. They trade small size for some loss in detail, which can matter for clean TTS signals.
Uncompressed audio stores raw samples. PCM in a WAV file is the usual choice. It uses the most space but guarantees every sample is kept.
|
Type
|
Bit-for-bit recovery
|
Typical file size
|
Typical use case
|
|
Uncompressed (PCM/WAV)
|
Yes
|
Very large
|
Editing, mastering, AI input
|
|
Lossless (FLAC)
|
Yes
|
Medium
|
Archival, high-quality delivery
|
|
Lossy (MP3/AAC/Opus)
|
No
|
Small
|
Streaming, final delivery
|
Why it matters for dubbing and TTS
Choice affects quality, latency, and compatibility. Use uncompressed or lossless files for input to neural TTS systems when possible. They keep transient details that voice models and alignment need. For final delivery, pick a compressed format tuned to your audience and platform.
Practical tip: if you need metadata like language codes or chapter markers, prefer containers that support tags, such as WAV (RIFF) or MP4 (ISO-based). That keeps your localization pipeline intact.
What are audio output formats? Codecs vs containers, lossy vs lossless
Audio output formats name how sound is stored, sent, and read by software and devices. Knowing the difference helps you pick files that keep voice clarity, sync with video, and play well in AI dubbing tools. This section explains codecs, containers, and the difference between lossy, lossless, and uncompressed audio in plain terms.
Codecs vs containers: plain terms
A codec (coder-decoder) is the method used to turn raw audio into a smaller file and then back to sound. It defines how samples get compressed, what data is thrown away, and the CPU needed to decode. A container is the file wrapper that holds one or more streams, like audio, video, or subtitles, plus metadata such as timestamps and channel layout.
Common codecs and containers
-
Codecs: MP3, AAC, Opus, FLAC, PCM (pulse-code modulation). Each has different compression and latency traits.
-
Containers: WAV, MP4, MKV, MOV. Containers carry metadata and multiple streams, so they affect compatibility and editing.
Lossy, lossless, and uncompressed: what each means
Lossy codecs remove some audio data to cut file size. They make files small, but can add artifacts that matter for voice clarity. Lossless codecs compress without losing any data, so you can restore the original samples exactly. Uncompressed audio, like PCM in a WAV file, stores raw samples with no compression, giving maximum fidelity at the cost of large files.
Quick pros and cons
-
Lossy: small files, lower bandwidth, possible artifacts. Good for final delivery where size matters.
-
Lossless: smaller than raw, identical playback after decode. Good for masters and archival.
-
Uncompressed PCM: best for editing, lowest processing risk, largest files. Preferred for recording and TTS input.
Why codec and container choices matter for TTS and AI dubbing
Codec affects quality, latency, and CPU load during processing. Low-latency codecs like Opus are great for real-time work, but some platforms expect PCM for best synthesis results. Containers matter for metadata, subtitle timecodes, and channel mapping, which help align dubbed audio to video. Finally, pick a format that matches your workflow: use PCM/WAV for editing and AI input, then choose a delivery codec based on bandwidth and player compatibility.
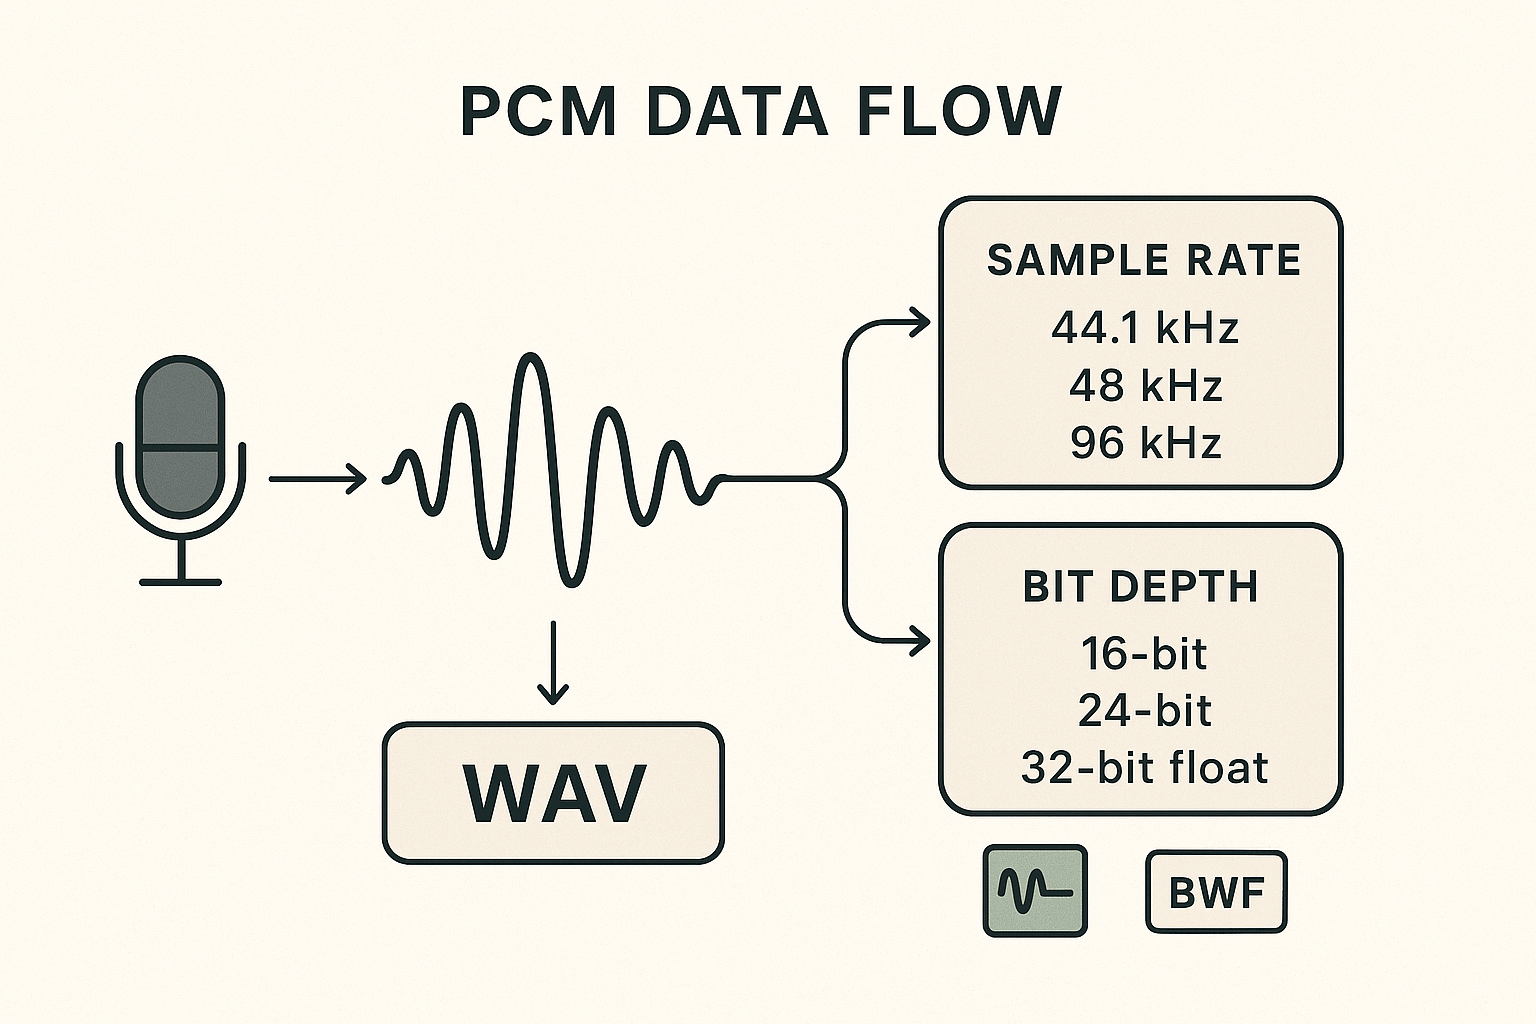
PCM & WAV deep dive: structure, sample rate, bit depth and why it matters
Start here: PCM (pulse-code modulation) is how most digital audio stores raw waveform samples. For anyone preparing files for neural TTS or AI dubbing, choosing the right sample rate and bit depth matters more than the file name. Uncompressed WAV (or broadcast WAV/BWF, AIFF) preserves every sample, which avoids codec artefacts and simplifies alignment during voice synthesis.
How PCM encodes sound, simply
PCM turns voltage from a microphone into regular numeric samples. The sample rate (samples per second) sets the audio bandwidth the file can represent, governed by Nyquist: the highest reproducible frequency is half the sample rate. So 48 kHz covers up to 24 kHz, which is above human hearing. The bit depth sets the detail of each sample, and determines dynamic resolution and noise floor.
Why sample rate choices matter
Pick a sample rate that matches your delivery platform. Common anchors are:
|
Sample rate
|
Use case
|
Quick note
|
|
44.1 kHz
|
Music, podcast final delivery
|
CD standard, covers human hearing
|
|
48 kHz
|
Video, streaming, neural TTS input
|
Industry standard for video and post-production
|
|
96 kHz
|
Archival, high-res recording
|
Good for heavy processing, upsampling later
|
Higher rates can help some editing tasks, but they increase file size and CPU load. For dubbing, 48 kHz is the practical sweet spot.
Bit depth: noise floor and headroom
Bit depth controls how many discrete amplitude steps each sample can store. Each extra bit adds about 6 dB of dynamic range. So:
-
16-bit gives about 96 dB dynamic range. That is fine for final distribution.
-
24-bit gives about 144 dB of range and much lower quantization noise, so use 24-bit for recording and editing.
-
32-bit float stores an extended dynamic range and avoids clipping during heavy processing, use it while editing if your DAW supports it.
In practice, record at 24-bit and keep editing in 32-bit float if possible. Export to 24-bit or 16-bit only at the final stage, depending on delivery needs.
WAV vs AIFF vs BWF: pick safety
WAV, AIFF, and BWF are containers for PCM. They all store raw samples without lossy compression. BWF adds broadcast metadata fields which help localization and QC. For neural TTS input, uncompressed WAV or BWF is safest because the model sees exactly what you recorded.
Recommended combos and quick guidance
-
Record: 48 kHz, 24-bit, mono for voice. Leave 6 dB of headroom to avoid clipping. Use 32-bit float in-session if possible.
-
Edit: Keep project sample rate at 48 kHz. Use non-destructive processing and avoid early normalization.
-
Export for TTS input: WAV (PCM), 48 kHz, 24-bit, mono. Use BWF if you need metadata like timecode.
-
Export for final delivery: Match platform. For YouTube, 48 kHz 24-bit or 16-bit WAV, or a high-bitrate MP3 if file size matters.
Practical tips and pitfalls
-
Don’t transcode lossy-to-lossy. Always keep a WAV master. 2. Avoid dithering until your final bit depth step. 3. If you resample, use a high-quality resampler to avoid ringing or aliasing. 4. Keep quiet room recordings and a low-noise preamp to preserve dynamic range.
Short checklist before sending to a TTS or dubbing engine
-
One mono WAV file per voice track. 48 kHz / 24-bit. 6 dB headroom. No clipping. No unnecessary fades or processing baked in. Metadata okay via BWF.
A proper WAV master saves time downstream. Neural TTS benefits from clean samples, consistent levels, and precise timing, so start with uncompressed PCM and avoid lossy compression until final delivery.
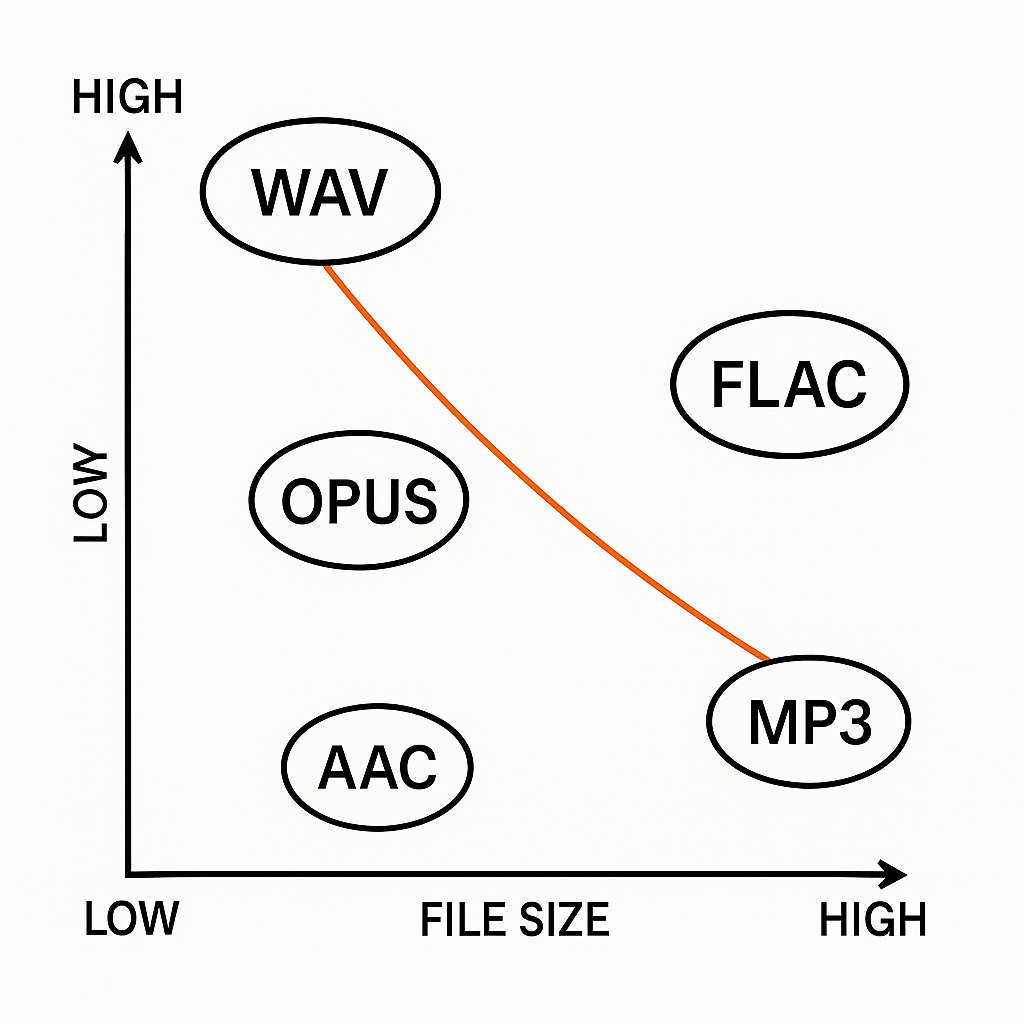
How common formats compare (MP3, AAC, FLAC, Opus, DSD and more)
Choosing the right audio format means balancing file size, perceived quality, latency, and platform reach. This section compares the common codecs and containers you’ll see in dubbing and TTS pipelines. It focuses on practical tradeoffs so you can pick an input format and a delivery format with confidence.
Quick summary of strengths and limits
Lossy formats like MP3 and AAC cut file size and make streaming easy, but they drop audio detail. Opus gives better quality at low bitrates, which helps with bandwidth and latency sensitive uses. Lossless options such as FLAC and WAV (PCM) preserve all audio detail, useful for editing, voice cloning, and archival. DSD is an archival specialist, not practical for everyday dubbing, but worth noting for masters.
For example, Opus supports bit-rates from Opus API Documentation 6 kb/s to 510 kb/s.
Format comparison table
|
Format
|
Type
|
Typical bitrate / file size
|
Perceived quality
|
Latency
|
Platform support
|
Best use case
|
|
WAV (PCM)
|
Lossless, uncompressed
|
1,411 kb/s (16-bit/44.1kHz)
|
Reference, no loss
|
Very low
|
Universal
|
Editing, AI training, voice cloning
|
|
FLAC
|
Lossless, compressed
|
~400-1,000 kb/s
|
Identical to PCM after decode
|
Low
|
Broad (desktop, some web)
|
Archive masters, deliver lossless audio
|
|
MP3
|
Lossy
|
96-320 kb/s
|
Good at 192 kb/s+
|
Low
|
Universal
|
Small files for delivery, podcasts
|
|
AAC
|
Lossy
|
96-256 kb/s
|
Better than MP3 at same bitrate
|
Low
|
Broad (mobile, streaming)
|
Mobile delivery, streaming platforms
|
|
Opus
|
Lossy, low-latency
|
6-510 kb/s
|
Excellent at low bitrates
|
Very low
|
Growing (webRTC, modern apps)
|
Real-time dubbing, low-bandwidth streaming
|
|
DSD
|
Lossless-ish, PCM alternative
|
Very large (depends on sample)
|
Very high, archival
|
Variable
|
Limited (pro audio gear)
|
Archival masters, audiophile releases
|
Notes on perceived quality and latency
Perceived quality depends on bitrate, codec design, and material. Speech compresses very well, so lossy codecs often sound fine even at low bitrates. Music needs higher bitrates to avoid artifacts. Latency matters for real-time dubbing or live voice conversion. Opus and modern AAC profiles prioritize low delay. WAV and FLAC add no codec delay, which is why they’re preferred for editing and model input.
DSD and emerging formats to watch
DSD stores audio differently, using pulse density, and can capture subtle analog-like detail. It creates very large files and needs specific playback hardware. It’s not a standard for TTS or dubbing, but it’s relevant for long-term archives and remastering. Also watch containers like Matroska and low-latency profiles of Opus and new codecs that aim to reduce bandwidth without hurting voice clarity.
Practical pick-me guidance
If you need clean input for neural TTS or voice cloning, use WAV (PCM) 48 kHz, 24-bit when possible. For final delivery to viewers on social or streaming, MP3 or AAC at 128–256 kb/s works well. For real-time dubbing or low bandwidth, use Opus. For masters and archives pick FLAC or DSD depending on your workflow.
Audio input quality sets the ceiling for any neural voice. If you feed a model low-fidelity or noisy files, the synthesized result will inherit those flaws. This is why audio output formats matter when you prepare files for TTS and AI dubbing workflows.
Why clean input matters
Neural models learn from what they hear. High noise floor, background hum, or clipping reduce model confidence. That causes garbled consonants, dull highs, and unstable prosody in the rendered voice.
Sample rate and bit depth control fidelity
Sample rate sets how high in frequency the audio goes. Bit depth sets dynamic range and noise floor. For most video and dubbing work, use 48 kHz and at least 24-bit for recording or masters. For podcasts, 44.1 kHz and 16-bit is usually fine. Higher sample rates rarely help after 48 kHz, but too-low rates (22 kHz) strip high frequencies and harm naturalness.
Compression artifacts reduce clarity
Lossy codecs remove data to save bandwidth. That removal often targets high frequencies and transients. Low-bitrate MP3, aggressive AAC, or heavy streaming compression can smear plosives and sibilance. Use lossless input, like WAV PCM or FLAC, for model training, cloning, or reference tracks. For final delivery, compressed formats are fine if you export at high bitrate.
Latency, file size, and workflow tradeoffs
Batch dubbing tolerates larger files and longer processing. In batch, prefer WAV or FLAC files with headroom and no aggressive normalization. Real-time or low-latency voice replacement may need Opus or low-bitrate AAC. These codecs reduce bandwidth and lower latency, but expect a small drop in timbral fidelity.
Quick recommended export settings
-
Input for neural dubbing: WAV PCM, 48 kHz, 24-bit, mono per speaker, no noise reduction baked in, leave -3 dB headroom.
-
Masters and archives: WAV or FLAC, 48 kHz, 24-bit (stereo if needed).
-
Fast delivery/streaming: Opus 64–96 kbps for speech, or AAC 128–192 kbps if Opus is unavailable.
-
Final podcast/video deliverables: MP3 192–320 kbps or AAC 128–256 kbps.
Checklist before upload
-
Trim silence and remove obvious clicks.
-
Keep original unprocessed files as masters.
-
Avoid double compression, re-export once from the master.
-
Label sample rate and bit depth in file names.
If you want to try these settings in a usable AI dubbing tool, Start your 3-day free trial and test WAV inputs for AI dubbing.

Choosing the right format: decision tree by project type
Start here: pick the branch that matches your project, then follow the export specs. This decision tree helps teams pick audio output formats fast, with clear reasons and exact settings for AI dubbing and neural TTS pipelines. If you care about consistency, export a single master and derive delivery copies from it.
How to use the tree
Begin with your project type, then ask two quick questions: do you need maximum fidelity for further processing, and what final delivery size or platform limits matter? If you need editing or voice cloning, favor an uncompressed master. If you only need quick streaming delivery, prioritize bitrate and codec compatibility.
Podcast (episodic spoken word)
Rationale: Podcasts need clean dialogue, stable loudness, and wide host/player compatibility. You want a high-quality master for editing and a compressed file for distribution.
Prescriptive export specs:
-
Master: WAV (PCM), 48 kHz, 24-bit, mono or stereo depending on recording. Use 32-bit float if heavy mixing is planned.
-
Loudness: -16 LUFS integrated for stereo podcasts, true peak -1 dBTP.
-
Delivery: MP3 128–192 kbps CBR or AAC-LC 128 kbps for app stores.
Film localization (dialog replacement for picture)
Rationale: Localization needs sample-accurate sync and headroom for mixing with music and effects. Preserve bit depth and timecodes when possible.
Prescriptive export specs:
-
Master: WAV (PCM), 48 kHz, 24-bit, interleaved stereo or multitrack stems. Include timecode or aligned clip names.
-
Headroom: keep peaks below -6 dBFS during recording, normalize in mastering if needed.
-
Delivery: WAV 48 kHz/24-bit for editorial, MP3 or AAC only for review copies.
Short social clips (Reels, Shorts, TikTok)
Rationale: Fast turnaround, small files, loud and intelligible speech. You can trade a bit of fidelity for smaller size and faster uploads.
Prescriptive export specs:
-
Master: WAV 48 kHz, 24-bit recommended; 16-bit acceptable for small teams.
-
Loudness: -14 LUFS integrated for social platforms, true peak -1 dBTP.
-
Delivery: Opus 64–96 kbps for best quality/size, or MP3 96–128 kbps if Opus not supported.
Archival masters (preserve for future rework)
Rationale: Long term value, future-proofing, and highest fidelity matter most. Keep lossless, uncompressed files and metadata.
Prescriptive export specs:
-
Master: WAV (PCM) or FLAC lossless, 96 kHz if original recording supports it, 24-bit or higher.
-
Metadata: include session notes, mic/channel mapping, and BWF chunks if possible.
-
Delivery: FLAC for storage, WAV for edit sessions.
Quick decision checklist
-
Need editing or dubbing later? Use WAV/PCM master.
-
Need smallest file for streaming? Choose Opus or MP3.
-
Film or mixing jobs need 48 kHz/24-bit and stems.
-
Archive in lossless, include metadata.
Conversion best practices & interoperability (including ffmpeg examples)
Start by keeping the original sample rate and bit depth whenever possible. That simple rule prevents conversion loss and preserves the fidelity neural TTS models and AI dubbing systems prefer. This section covers practical ffmpeg commands, batch patterns, metadata tips, and common conversion pitfalls to avoid in localization pipelines.
Preserve sample rate and bit depth: why it matters
Always inspect the source with ffprobe before converting. Match the target sample rate and bit depth to your pipeline needs, 48 kHz and 24-bit are common for video and professional dubbing. If you must resample, use a high-quality resampler and avoid multiple resample steps.
Lossless and production-ready ffmpeg commands
Lossless WAV (convert and set bit depth):
ffmpeg -i input.wav -ar 48000 -ac 2 -sample_fmt s24 output_48k_s24.wav
FLAC (lossless compressed):
ffmpeg -i input.wav -c:a flac -compression_level 5 output.flac
For compressed delivery, use production settings:
MP3 high quality (delivery):
ffmpeg -i input.wav -c:a libmp3lame -b:a 320k output.mp3
AAC VBR (streaming):
ffmpeg -i input.wav -c:a aac -b:a 192k -movflags +faststart output.m4a
If you need to resample with high quality, add the soxr resampler:
ffmpeg -i input.wav -af aresample=resampler=soxr -ar 48000 -sample_fmt s32 output_48k_s32.wav
Note that FFmpeg-user mailing list (2022) states FLAC is by definition VBR, anything else would just be waste of space.
Batch workflows and metadata handling
Use simple shell loops for file batches. Example:
for f in *.wav; do ffmpeg -i "$$f" -ar 48000 -ac 2 -sample_fmt s24 $${f%.wav}_48k_s24.wav"; done
Preserve tags with -map_metadata 0 when moving formats that support metadata. For MP3, set ID3 version with -id3v2_version 3. Remember WAV has limited metadata support, so keep rich tags in sidecar files (JSON or a CSV) for localization teams.
Common pitfalls and how to avoid them
-
Resampling artifacts: avoid cheap converters. Use soxr or libsamplerate in ffmpeg and resample once.
-
Clipped peaks: check levels, use
-af loudnormor apply headroom, don’t normalize to 0 dBFS. -
Metadata loss: carry tags with -map_metadata or export sidecar files for translations and versioning.
Follow a lossless-first workflow: edit and align in WAV or FLAC, then export compressed masters for delivery. That keeps audio quality high for neural TTS and AI dubbing while ensuring interoperability across platforms.
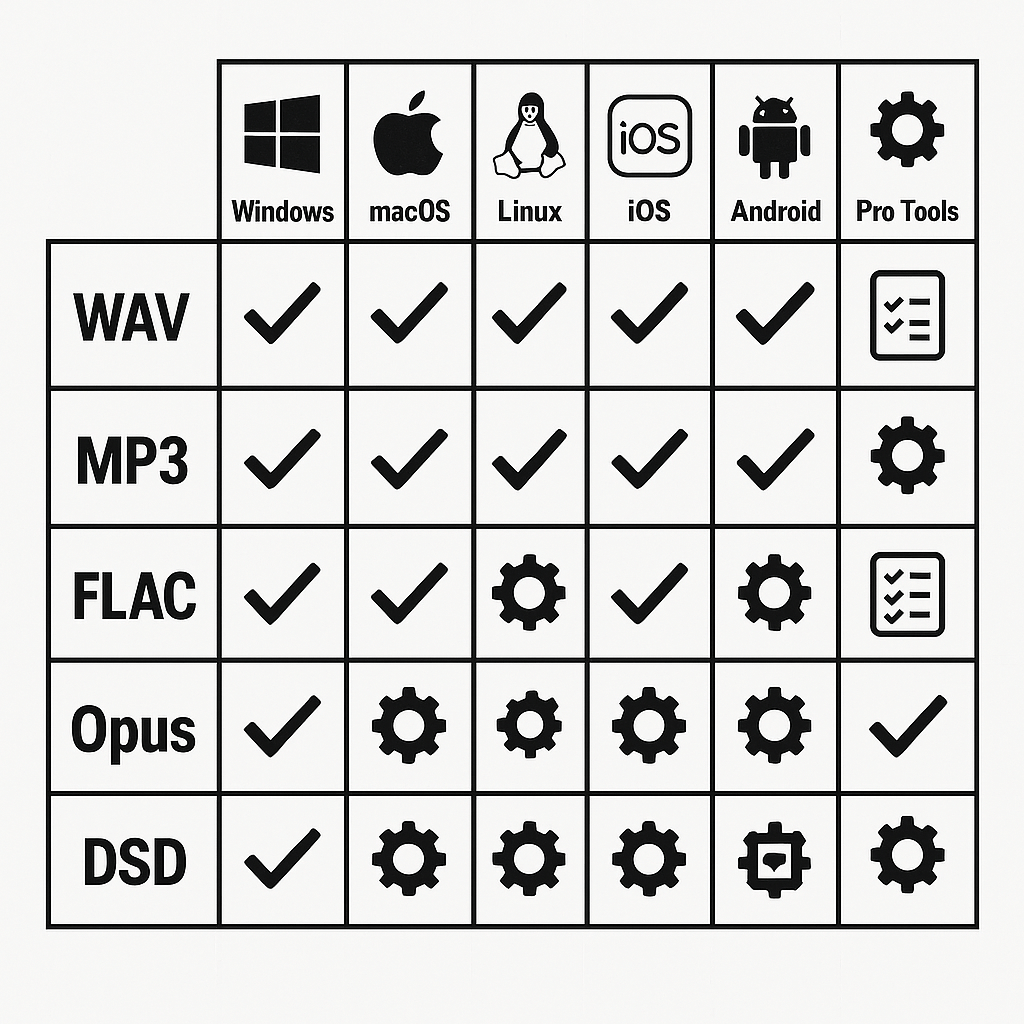
Platform compatibility & troubleshooting matrix
This matrix helps your team confirm which audio output formats import and export cleanly across Windows, macOS, Linux, mobile, and common DAWs. It lists quick fixes for playback and import errors, and a short diagnostic checklist to confirm file integrity before you send assets into a dubbing pipeline. Use it to spot missing codecs, sample rate mismatches, metadata problems, and other blockers fast.
Quick compatibility matrix
|
Platform / App
|
WAV (PCM)
|
MP3
|
FLAC
|
Opus
|
DSD
|
Notes
|
|
Windows (File Explorer, Media Player)
|
Yes
|
Yes
|
Yes
|
Partial
|
No
|
Native support varies by player
|
|
macOS (Finder, QuickTime)
|
Yes
|
Yes
|
Partial
|
Partial
|
No
|
Use AVFoundation apps for best results
|
|
Linux (Ubuntu, GNOME)
|
Yes
|
Yes
|
Yes
|
Yes
|
Partial
|
Codec packages may be required
|
|
iOS (native apps)
|
Yes
|
Yes
|
No
|
No
|
No
|
AAC preferred on iOS apps
|
|
Android (native apps)
|
Yes
|
Yes
|
Partial
|
Partial
|
No
|
Wide OEM variance in codecs
|
|
Pro Tools
|
Yes
|
Partial
|
Partial
|
No
|
No
|
Pro Tools prefers WAV/AIFF, limited lossy support
|
|
Logic Pro
|
Yes
|
Partial
|
Partial
|
No
|
No
|
Best with WAV/AIFF PCM
|
|
Reaper
|
Yes
|
Yes
|
Yes
|
Yes
|
No
|
Highly flexible, add plugins for DSD
|
|
Audacity
|
Yes
|
Partial
|
Yes
|
Partial
|
No
|
LAME/FFmpeg libs extend support
|
Common import and playback fixes
-
Install missing codecs: on Windows add K-Lite or use VLC for testing. On Linux install ffmpeg package. macOS users can use Perian alternatives or export from ffmpeg.
-
Match sample rate and channels: resample to your project rate (commonly 48000 Hz) and confirm stereo vs mono. Mismatch causes playback speed and sync issues.
-
Normalize bit depth: convert to 16-bit or 24-bit PCM if a platform rejects high-resolution files.
-
Strip or fix metadata: weird tags sometimes block imports; use ffmpeg or a tag editor to clear tags.
Diagnostic checklist before sending assets
-
Verify file plays end to end in VLC.
-
Confirm sample rate and bit depth with ffprobe or your DAW.
-
Run a quick CRC or checksum to check corruption.
-
Export a 5–10 second sample in the target format and re-import into the dubbing tool.
-
If issues remain, re-render to WAV PCM 48 kHz, 24-bit, stereo and retry.
This checklist gets files ready for neural TTS and AI dubbing workflows, reducing rework and lost time.
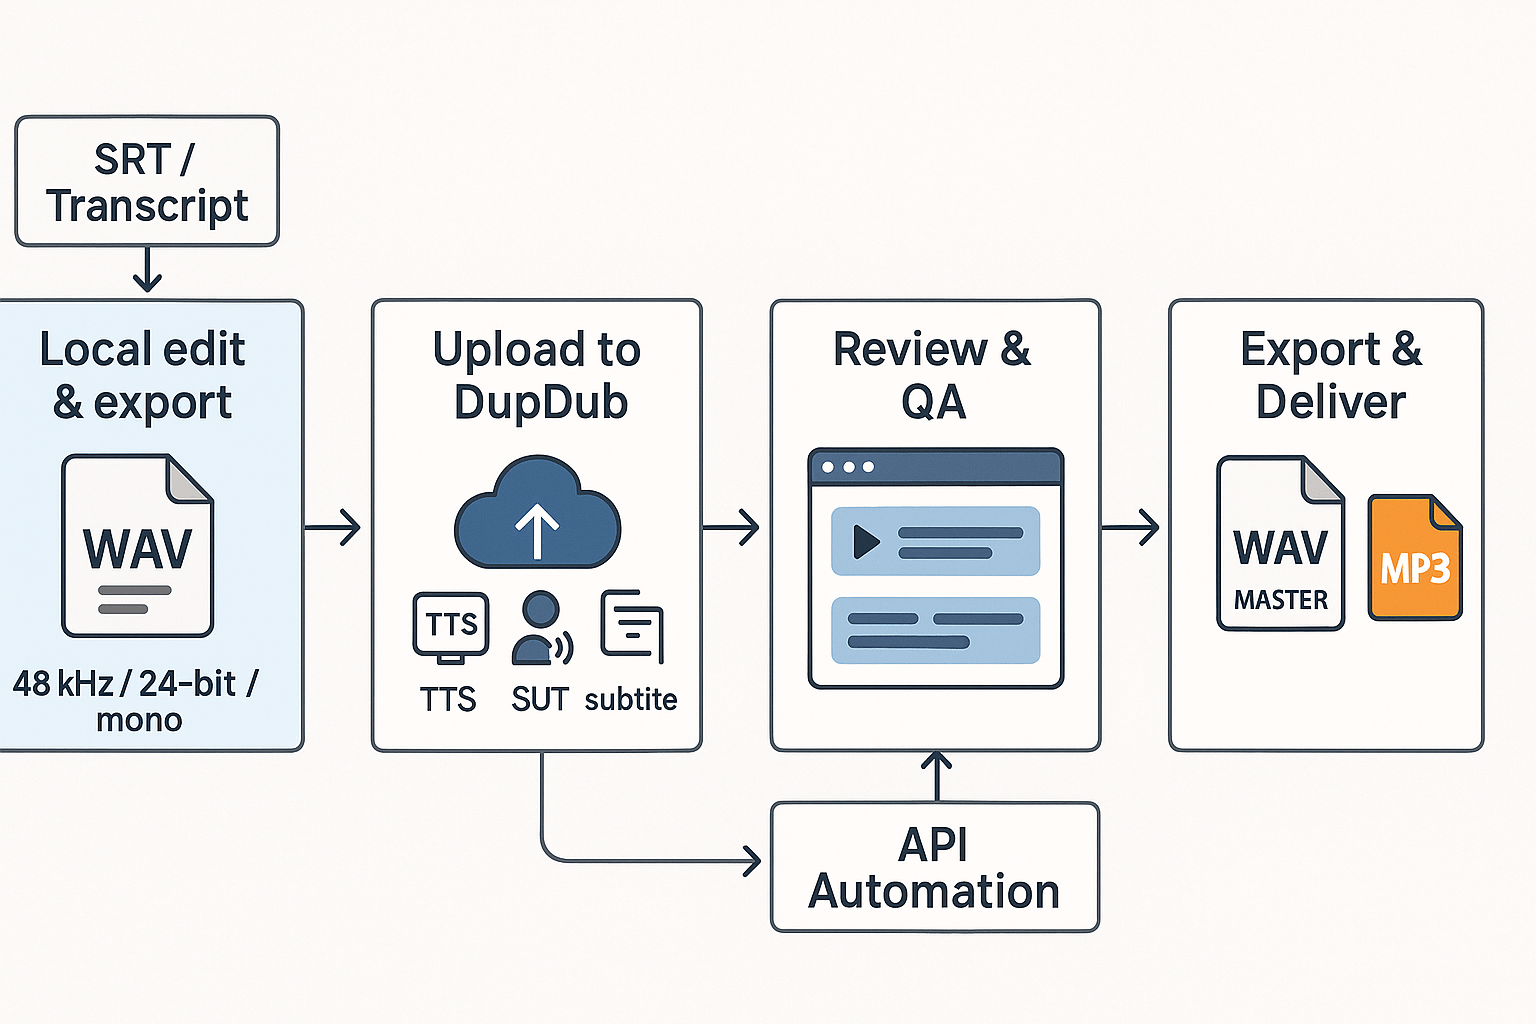
Prepare a clean PCM WAV master before you touch a dubbing tool. Good source audio avoids artifacts, keeps voice character, and speeds editing. Include one clear sentence or clip per track, use consistent levels, and export using standard specs for AI dubbing workflows and audio output formats.
Prep: create a WAV/PCM master
Start with 48 kHz sample rate and 24-bit depth for most video work. Deliver mono for dialogue when possible, or stereo if spatial info matters. Normalize peaks to -3 dBFS, remove room noise, and keep soft limiting light. Label tracks clearly and include an SRT or transcript for alignment.
Run batch dubbing in DupDub
Upload your WAV master and the transcript to DupDub. Pick a cloned voice or a neural TTS voice and set language and style. Use batch mode or the API for multiple files or languages. Review automatically generated timings and the aligned subtitles, then tweak short clips in the editor.
Export: when to pick WAV vs MP3
Export WAV (48 kHz, 24-bit) when you need a deliverable master, archival file, or further mixing. Choose MP3 (192–320 kbps) for final downloadable assets, streaming, or low-bandwidth delivery. For platform uploads, follow the host's preferred codec and bitrate.
Checklist: quick actions
-
Export clean WAV/PCM master: 48 kHz, 24-bit, mono if dialogue.
-
Provide accurate transcript or SRT for alignment.
-
Batch-process in DupDub or use the API for scale.
-
Review timing, voice style, and loudness in-browser.
-
Export final WAV masters for archiving, MP3 for delivery.
How DupDub fits a localization pipeline DupDub handles STT, TTS, alignment, and batch exports. Drop WAV masters in at the start, then use exports for editors or platform uploads. For deeper format guidance see the Neural TTS cluster.
FAQs: quick answers to common questions about audio output formats
-
Is WAV always best for audio output formats in AI dubbing?
WAV (PCM) is the best input for AI dubbing and voice cloning. It is uncompressed, predictable, and avoids artifacts.
-
When is Opus or MP3 acceptable for delivery and TTS pipelines?
Use Opus for streaming and social clips where size matters. MP3 is fine for podcasts and final delivery, but avoid them as raw cloning input.
-
Which sample rate should I choose for AI dubbing projects?
Choose 48 kHz for video and professional dubbing. Use 44.1 kHz for music or podcast masters; 16 kHz only for telephony.
-
How should I export files for voice cloning and neural-TTS?
Export clean WAV files, 48 kHz and 24-bit when possible. Provide 30 to 60 seconds of dry, consistent speech, no heavy processing.
-
When should I use FLAC or other lossless formats?
Use FLAC for archival or smaller lossless delivery. Only use it for TTS input if the service accepts FLAC; otherwise send WAV.
 Discord
 YouTube
 Tiktok
 Twitter
 Facebook