


-
Fastest polished route: generate AI voice, export MP3, then Insert > Audio in Slides. This scales best for long courses.
-
Easiest low-tech route: record on your phone, export MP3, and upload. Good for teachers and small presentations.
-
Best control: record WAV, edit for timing, then import. Use when audio precision matters.
Why add voiceover to Google Slides? (benefits & common use cases)
How narration improves learning and clarity
Common use cases
-
Lessons and recorded lectures, where teachers want consistent delivery across sessions.
-
E learning modules and online courses, to add a human voice without live sessions.
-
Sales decks and pitch materials, to keep messaging tight and persuasive for on-demand viewers.
-
Staff training and onboarding, so new hires can learn at their own pace.
Time savings and clarity gains
-
Faster production: record once, reuse many times. That cuts repeated rehearsal and live delivery.
-
Better comprehension: audio explains visuals and reduces reader strain. Learners finish lessons more confidently.
-
Higher engagement: viewers stay longer with voice and natural pacing. That means fewer dropoffs in online courses.
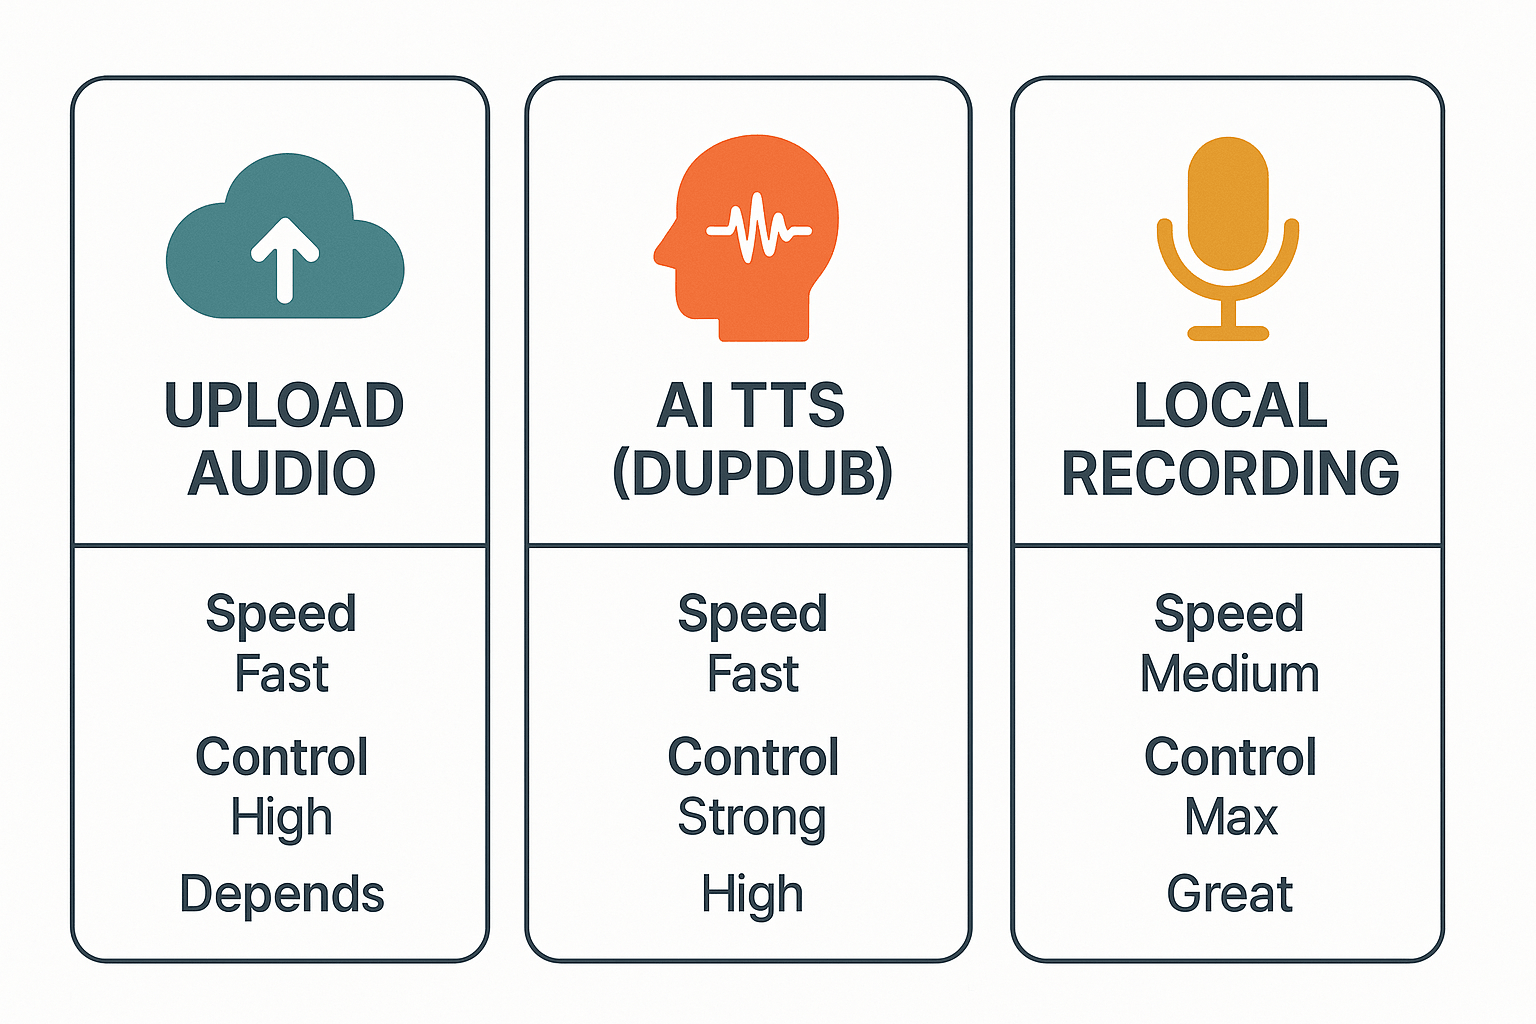
At-a-glance: 3 practical methods to add voiceover
Quick comparison of the three methods
-
Upload pre-recorded audio (Insert > Audio)
-
Speed: Very fast if you already have MP3 or WAV files.
-
Control: High, because you edit audio in a DAW or editor before upload.
-
Quality: Depends on your source files, can be studio-grade.
-
-
AI TTS with DupDub (DupDub → export MP3 → Insert)
-
Speed: Fast to generate voice files and iterate, especially using presets.
-
Control: Strong control over tone, pacing, and language using SSML (speech synthesis markup language) and voice selection.
-
Quality: Consistently high, close to human when you pick Ultra voices or fine-tune SSML.
-
-
Local recording and import (phone or desktop)
-
Speed: Slower because you record, edit, then export.
-
Control: Maximum natural expression and nuance from a human narrator.
-
Quality: Great with a proper mic and quiet room, but needs editing for polish.
-
How to choose
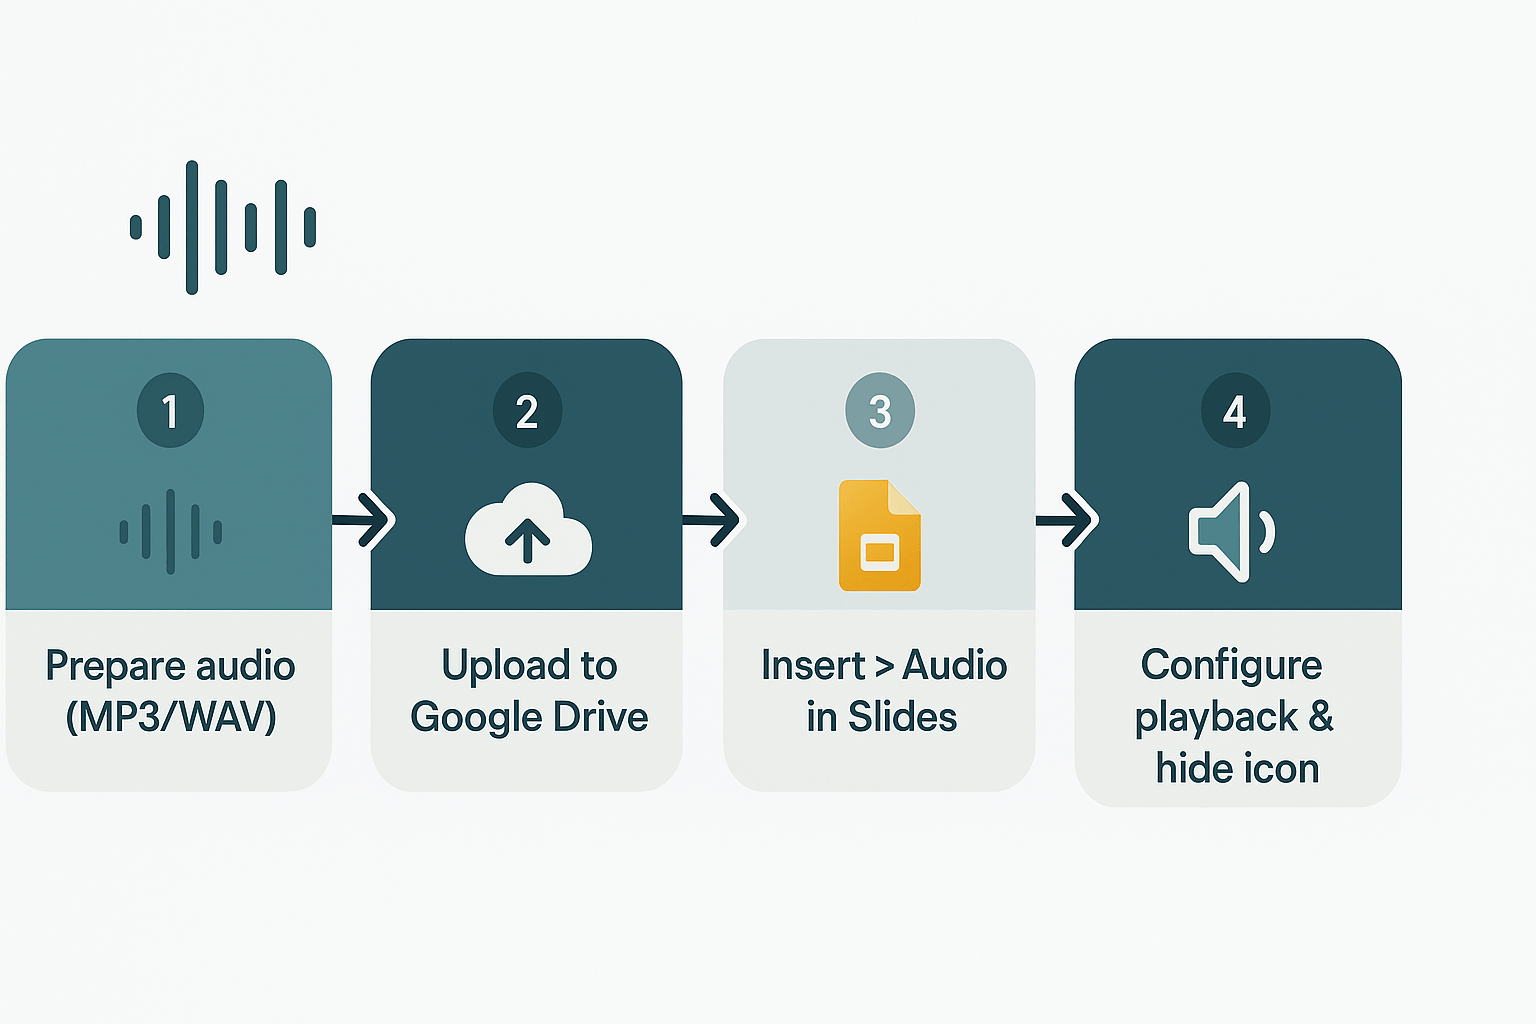
Method 1 — Upload pre-recorded audio (Insert > Audio) — step-by-step
Prepare your audio file
-
Export a clean MP3 or WAV from your editor. Aim for 44.1 kHz sample rate and 128–192 kbps for MP3 to balance quality and size. Keep each clip short, one per slide, for easier timing.
-
Normalize levels so each slide plays at similar loudness. Say the slide number in the file name, for example: 03_Intro.mp3.
-
Trim silence at the start and end. Short fades help avoid clicks when playback begins.
Upload the audio to Google Drive
-
Open Google Drive and create a folder for this presentation. That keeps files organized and share settings simple.
-
Drag your MP3/WAV files into the folder. Wait for each file to finish uploading.
-
If others need to view the slides, set the Drive folder sharing to at least "Anyone with the link can view" so Slides can access the audio.
Insert audio into a slide
-
In Google Slides, go to the slide where you want narration.
-
Click Insert, then Audio. A picker shows audio files in your Drive.
-
Select the matching MP3 or WAV, then click Select. The audio icon appears on the slide.
Configure playback and hide the icon
-
Select the audio icon and open Format options on the toolbar. The Audio playback pane appears on the right.
-
Choose Start: On click or Automatically. For synced narration, pick Automatically and set timing per slide.
-
Toggle Loop audio if the clip should repeat, and toggle Stop on slide change if you want it to cut when advancing.
-
Check Hide icon when presenting to keep slides clean. The audio still plays, but the icon won’t show in presentation mode.
Quick tips for timing and file names
-
Prefix files with slide numbers to avoid mistakes, for example 05_Features.mp3.
-
For precise pacing, make files slightly longer than the spoken content and use the slide advance timing to match visuals.
-
If audio won’t play, confirm Drive permissions and that the file finished uploading.
Method 2 — Generate high-quality AI voiceovers (DupDub workflow)
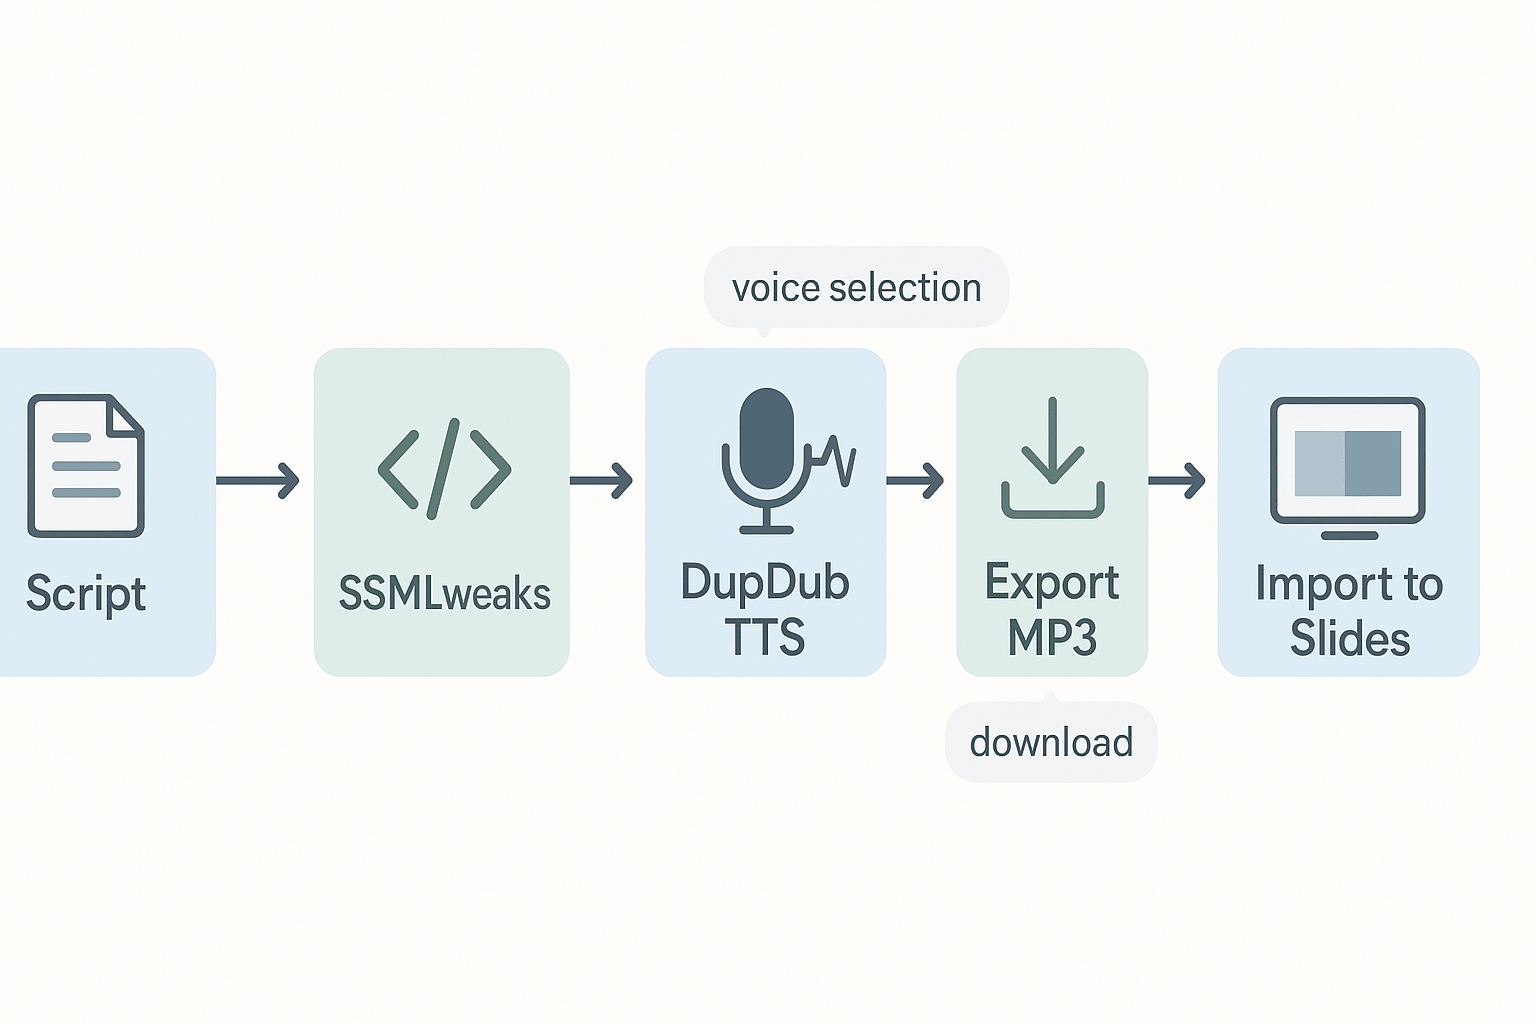
Quick overview of the DupDub workflow
-
Draft your slide script in a single document. Keep lines short and match each line to a slide.
-
Add SSML (Speech Synthesis Markup Language) tags to adjust pauses and emphasis.
-
Paste the script into DupDub, pick a voice and language, then generate audio.
-
Preview, tweak SSML or pacing, and export MP3.
-
Import the MP3 to Google Slides using Insert > Audio, then set playback options.
How to add simple SSML for better timing and emphasis
break to create a pause, or emphasis to stress key words. Here are two compact examples you can paste into DupDub’s SSML editor:-
Short pause example:
Please review the slide.<break time="500ms"/>Now look at the chart. -
Emphasis and prosody example:
This is <emphasis level="strong">important</emphasis>. <prosody rate="slow">Read carefully.</prosody>
Voice selection and quick tips for educators
-
Use consistent voice across a course to keep learners comfortable.
-
Choose a slower speaking rate for dense material.
-
Export a short sample MP3 first to check pacing against slide transitions.
Exporting and importing to Google Slides
Module1_Slide03.mp3. In Google Slides use Insert > Audio, choose the file from Google Drive, and then set it to play automatically or on click. Match slide transitions to the audio length for smooth delivery.Why DupDub speeds production
Method 3, Record narration locally (phone/desktop) and import
Best devices and apps for clean local recording
Mic setup checklist for quiet, clear audio
-
Choose a mic: USB condenser mics give good quality for the price. Lavalier mics work well for spoken narration.
-
Room: pick a small, carpeted room with few hard surfaces. Close windows and doors to cut noise.
-
Position: keep the mic 6 to 12 inches from your mouth. Use a pop filter to reduce plosives (hard P and B sounds).
-
Levels: record with peaks around -6 dB to avoid clipping. Do a short test and listen back.
-
Power and drivers: install drivers for USB mics and disable system sounds while recording.
Export settings, trimming silence, and file types
When local recording beats AI TTS
Troubleshooting common audio upload & playback issues in Google Slides
Quick checks to run before sharing
-
Play the slide in Edit mode to confirm embedded audio plays. 2. Open Presenter view and test audio there. 3. Try the exported MP4 or PDF if you plan to share a file.
-
Confirm the audio file lives in the same Google account and Drive folder as the presentation.
Audio not playing in presenter view
-
In Slide > Select the audio icon, open Format options, set Start playing to Automatically. Save.
-
Check system volume and browser tab sound. Mute icons can block playback.
-
If you use multiple audio tracks, ensure only one is set to auto play per slide.
Playback mis-sync when exporting
-
Use fixed slide durations: File > Publish to the web, or set slide advance times in the transition pane.
-
Export to MP4 from within Slides or record the Presenter view using a screen recorder while playing slides. That locks timing.
-
For AI-generated voiceovers, export a single MP3 per slide and re-import, rather than a stitched file.
Drive permission errors
-
Move audio files into the same shared Drive folder as the presentation.
-
Set audio files to "Anyone with the link can view" for public sharing.
-
Or embed audio into the presentation by uploading the MP3 to Slides via Insert > Audio while signed into the owner account.
Format and codec incompatibilities: tests and fixes
-
Play the file in a browser tab. If it fails, re-encode.
-
Re-encode to MP3 (128–192 kbps) or WAV (16-bit PCM) using a free tool like Audacity.
-
Rename .m4a to .mp3 only after re-encoding. Don’t just change the extension.
Final quick checklist
-
Verify auto-play settings per slide.
-
Confirm Drive sharing and file location.
-
Re-encode suspect files to MP3 or WAV.
-
Test Presenter view and exported videos before publishing.
Accessibility: captions, transcripts, and inclusive narration
Fast transcript: DupDub STT or Slides speaker notes
-
Upload your narration or generated MP3 to DupDub and run STT. Export the cleaned transcript as TXT or SRT.
-
Paste the transcript into Google Slides speaker notes for slide-level captions.
-
If you exported a video of your slides, import the SRT to add burned-in or soft subtitles in your video editor.
Add subtitles to exported video
Narration: clear reading and pacing
-
Speak slowly, pause after key points, and leave 1.5 to 2 seconds between sentences.
-
Use consistent voice and lower background noise.
-
Add brief on-screen text for names and acronyms.
-
Offer the transcript file on the slide deck or course page.
Decision table, audio quality best practices & privacy tips
Quick decision table
|
Method
|
Time
|
Cost
|
Quality
|
Control
|
Best for
|
|
Upload pre-recorded audio (Insert > Audio)
|
Low setup time
|
Low (free)
|
High if studio-ready
|
High (full editing)
|
Finalized, high-fidelity narrations
|
|
Local recording (phone/desktop) and import
|
Medium
|
Low–Medium
|
Medium to High (mic dependent)
|
High (manual edit)
|
Small teams, quick do-it-yourself narrations
|
|
DupDub AI TTS workflow
|
Low after script ready
|
Low–Medium subscription
|
High, consistent voices
|
Medium (SSML control)
|
Fast scalable voiceovers, multi-language needs
|
Audio quality checklist
-
Sample rate: 44.1 or 48 kHz for speech. SoundGearLab (2021): The Nyquist theorem states that to prevent loss of information when sampling a signal digitally, you have to sample at a rate of twice the highest expected signal frequency.
-
Bit depth: 16-bit is fine, 24-bit gives more headroom for editing.
-
File format: Use WAV for uploads when possible, export MP3 192–320 kbps for smaller files.
-
Noise floor: Aim for minimal background noise, use a quiet room or noise gate in post.
-
Levels: Keep peaks below -6 to -12 dBFS to avoid clipping and leave headroom for slides audio mixing.
-
Mic technique: Use a pop filter, keep consistent distance, and monitor with headphones.
-
SSML: Use SSML tags to adjust pauses and emphasis when using AI TTS for natural pacing.
Privacy and permissions tips
-
Google Drive: Store audio in a folder limited to collaborators. Avoid public links for drafts.
-
Sharing: Use view-only links for reviewers when possible, and revoke access after use.
-
Voice consent: If you clone or syntheticize a real voice, get written consent first. Log the consent record.
-
DupDub security summary: DupDub notes encrypted processing and voice cloning locked to the original speaker. Verify enterprise controls and GDPR alignment for sensitive projects.
FAQ — quick answers to common questions
-
Can audio autoplay across slides in Google Slides?
Yes, you can have one audio file play across multiple slides. Insert the audio, open Format options, set Start playing to Automatically, and uncheck Stop on slide change so it continues. Test in Presenter view before sharing, since browser or device settings can block autoplay.
-
Using DupDub: how to add voice over to Google Slides?
Yes, you can use DupDub voices in Slides by exporting the voice as MP3 or WAV, then Insert > Audio in your slide deck. In DupDub you can tweak pacing with SSML (speech markup) and pick a voice style before export. The free 3-day trial is useful to test voice options and export settings.
-
Best file formats for Google Slides audio files
Use MP3 for a good balance of quality and file size. WAV gives higher fidelity but larger files and slower uploads. Aim for 128 kbps or higher for MP3, and export from your TTS tool in MP3 when possible for reliable playback.
-
Adding captions and transcripts to Google Slides
Turn on live captions during presentation via Present > Captions for automatic on-screen text. For a full transcript, paste the text into Speaker notes or add a dedicated slide with the transcript. You can also export SRT or text from DupDub and attach it to your course or slide share.
-
Will audio stay in exported video from Google Slides?
Audio can be lost or behave inconsistently when you export slides as MP4, so don’t rely on that alone. Safer options are to screen record the presentation with system audio, or export the audio and merge it with the exported video in a simple editor. For a faster route, export your DupDub MP3 and combine it with your slides video in any basic editor.

 Discord
 YouTube
 Tiktok
 Twitter
 Facebook
 Instagram